Table of contents
| Edit | Search | |
| Internet | Display | |
| Miscellaneous | Help |
| File range for search | Using wildcards in searches | |
| Search results | ||
| When there are no finds |

| Brief introduction |
Corpus Presenter is a program with which you can view and search through any files you like. It runs on any computer using Microsoft Windows and has been tested with the latest version – Windows 11 – under which Corpus Presenter works very efficiently. The program can display files in a tree-like fashion which has inherent advantages for viewing and searching. You can also load any files you have by selecting them in a directory listing and loading them directly. When you load files directly there is no tree display. However, you can search through files just as you would with a corpus displayed in tree form, i.e. with an internal file structure.
Corpus Presenter can process ASCII, RTF or MS Word texts straight away. You may also convert any HTML texts to ASCII, RTF or MS Word texts from within Corpus Presenter on the directory listing level.
Here are some of the things you can do with Corpus Presenter:
1) Look at the elements of a corpus by moving in the tree structure visible on the left of the screen. By clicking on an item you can view the file which is associated with it. In the supplied test corpus there are four types of file available: 1) texts, 2) databases, 3) images and 4) sound files, all of which can be accessed by simply clicking on the relevant node.
2) Open another corpus and start working with this. If you have another Corpus Presenter corpus (a set of files with a small control file called a dataset file with the extension .CPD) then you can view the contents of this corpus as a hierarchical tree. To make your own corpus use the supplied utility CP Make Tree or generate a new corpus straight from the directory listing level of Corpus Presenter.
3) Find any string in a text or a database. When using texts you have three main ways of finding strings:
a) Use the Finding strings option, shortcut: Ctrl-F (see dedicated section below).
b) Use the Quick search option, shortcut: Ctrl-Q (see dedicated section below).
c) Make a word list from any set of texts, shortcut: Ctrl-W. (see dedicated section below).
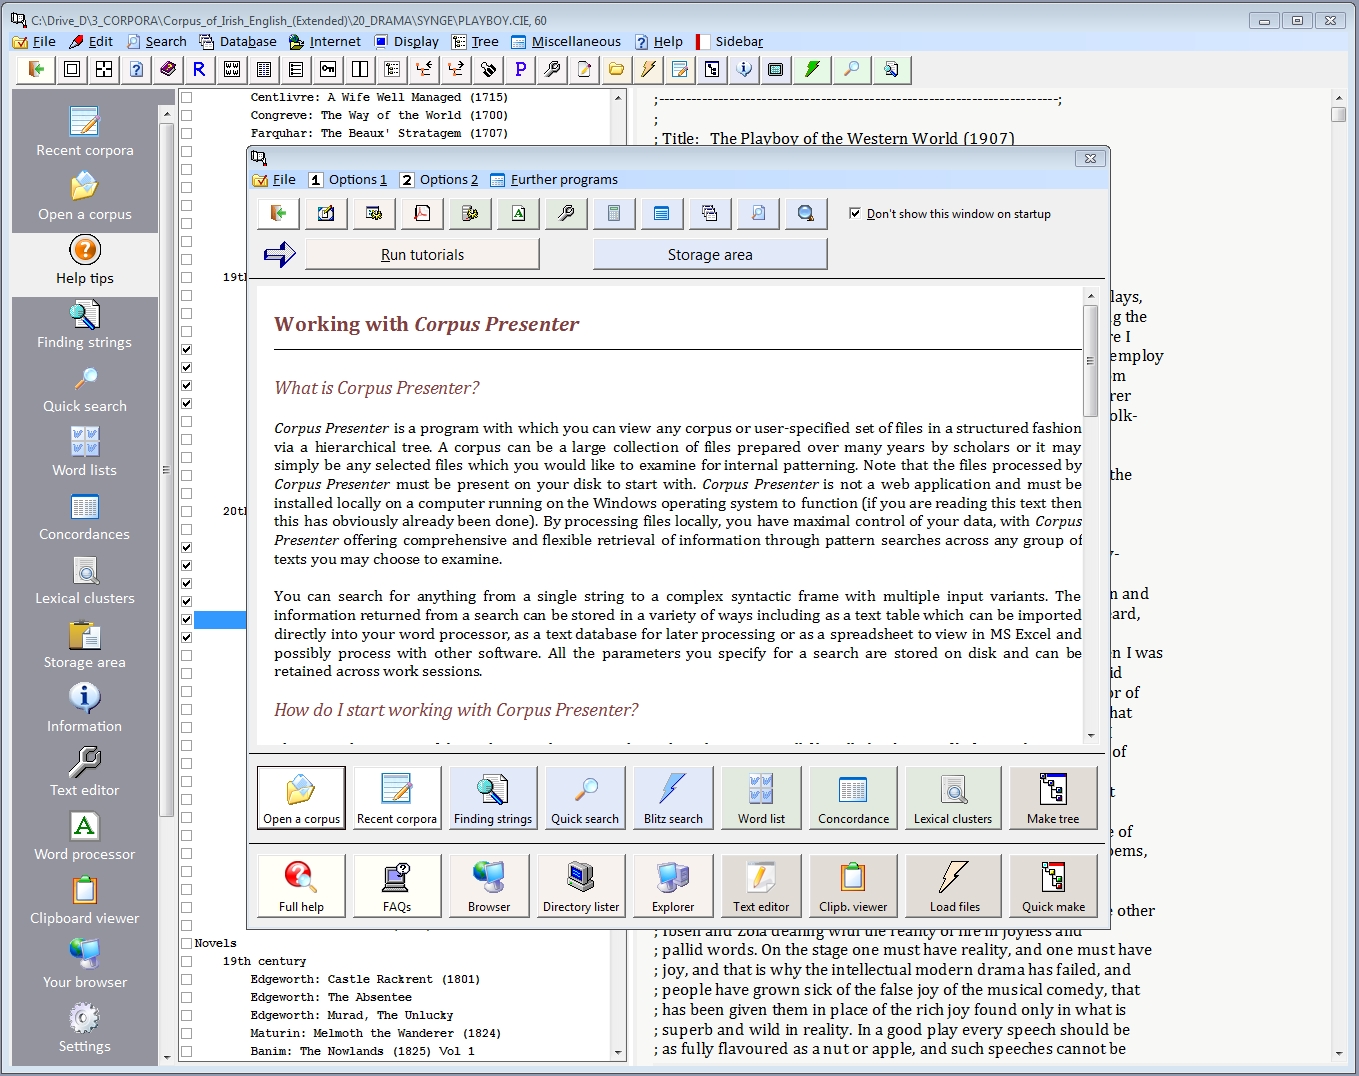
Help Tips
If you wish, you can open the Help Tips window (see second option from the top in the sidebar. Here the basic operation of Corpus Presenter is explained and the main options are put at your disposal via command buttons as can be seen in the following screenshot.
Context-sensitive help
On various levels of Corpus Presenter you can see one or more question marks on a blue background. When you click on one of these you obtain help relevant to the point of the program where you are currently located.
Doing statistics
The main aim of Corpus Presenter is to retrieve information from texts, whether organised as an internally structured corpus or not. The returns of a search can be stored as an MS Excel table, a database or a text file consisting of lists of numbers. These output files can then be used as input to one of the many statistical software packages available for personal computers.
| Desktop level |
When you start Corpus Presenter you are located on the so-called ‘desktop level’. This is where you can start any of the many search options and other features of the program. It is the level to which you return from other modules and the last level you reach before exiting the program.
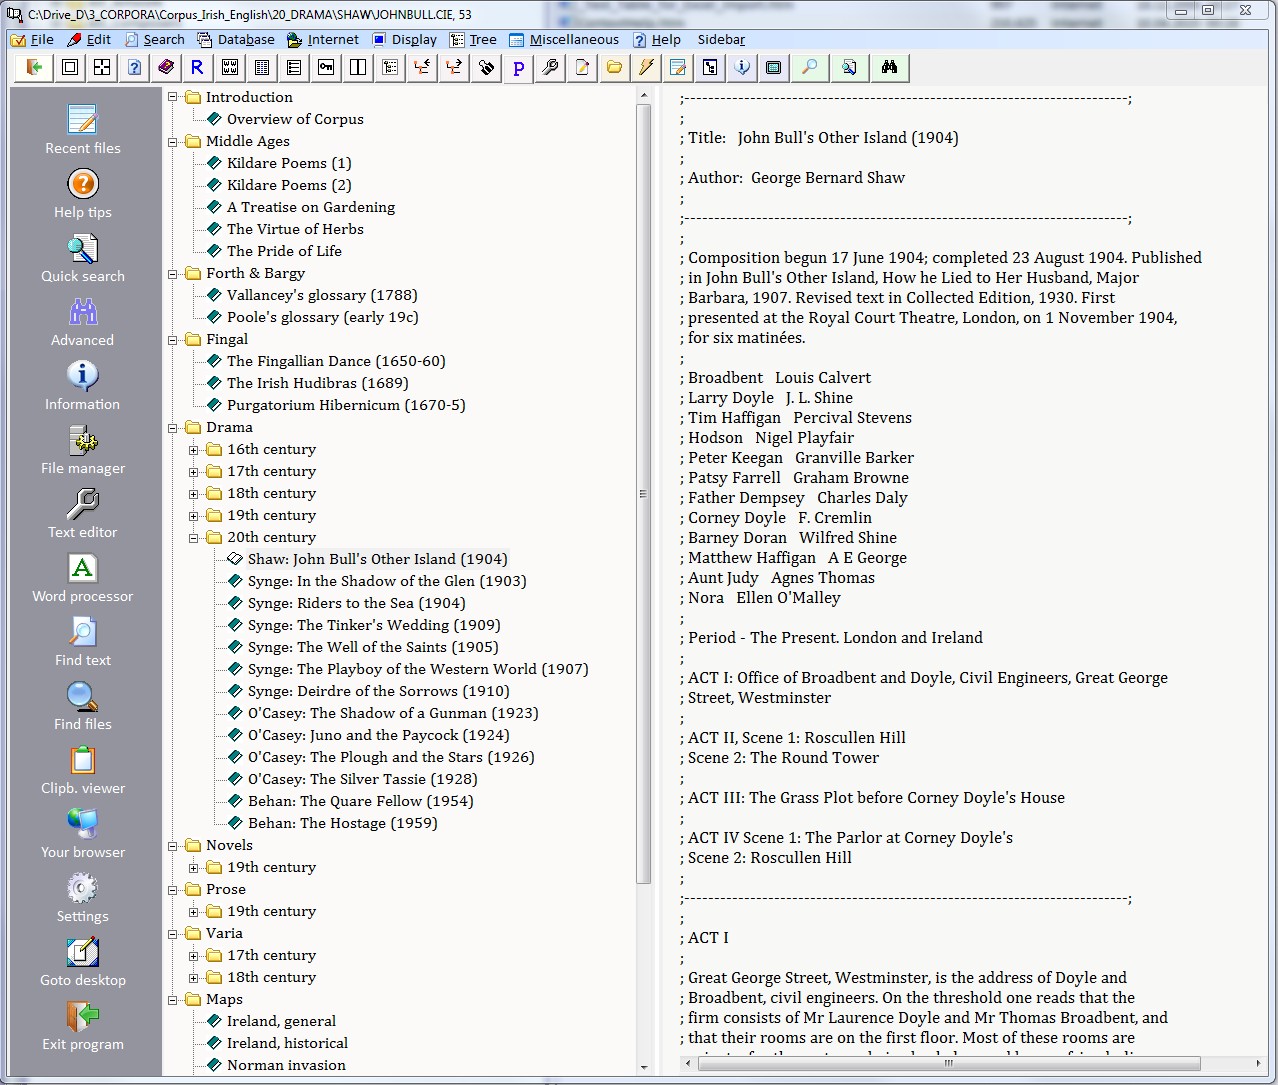
The appearance of the desktop level depends on whether you have loaded an internally structured corpus of texts as in the following screenshot. If this is the case then you will see a tree in the left-half of the screen and the contents of a text file on the right, assuming that the currently active node of the tree on the left points to a text file.
You can alter the display of files by pressing F11 or choosing the relevant option in the Display menu, i.e. Tree or list display. With the latter, the files are shown as a plain list with a little check box before each file name. You can select a file by clicking on this box. When searching files, you can choose ‘Only checked files’ as range, if you like. Checked files need not be contiguous in a list. You can switch between a vertical and a horizontal division of the screen with a file list by hitting the F11 key.
| Files linked to tree |
The current display shows what files are associated with what nodes in the tree for the current corpus. To alter the values you see here, edit the current corpus dataset with the supplied program CP Make Tree. This program is accessible in the “File” menu via the option “Create/edit a dataset” (control file for tree), shortcut: Ctrl-N.
| Hyperlinks for texts |
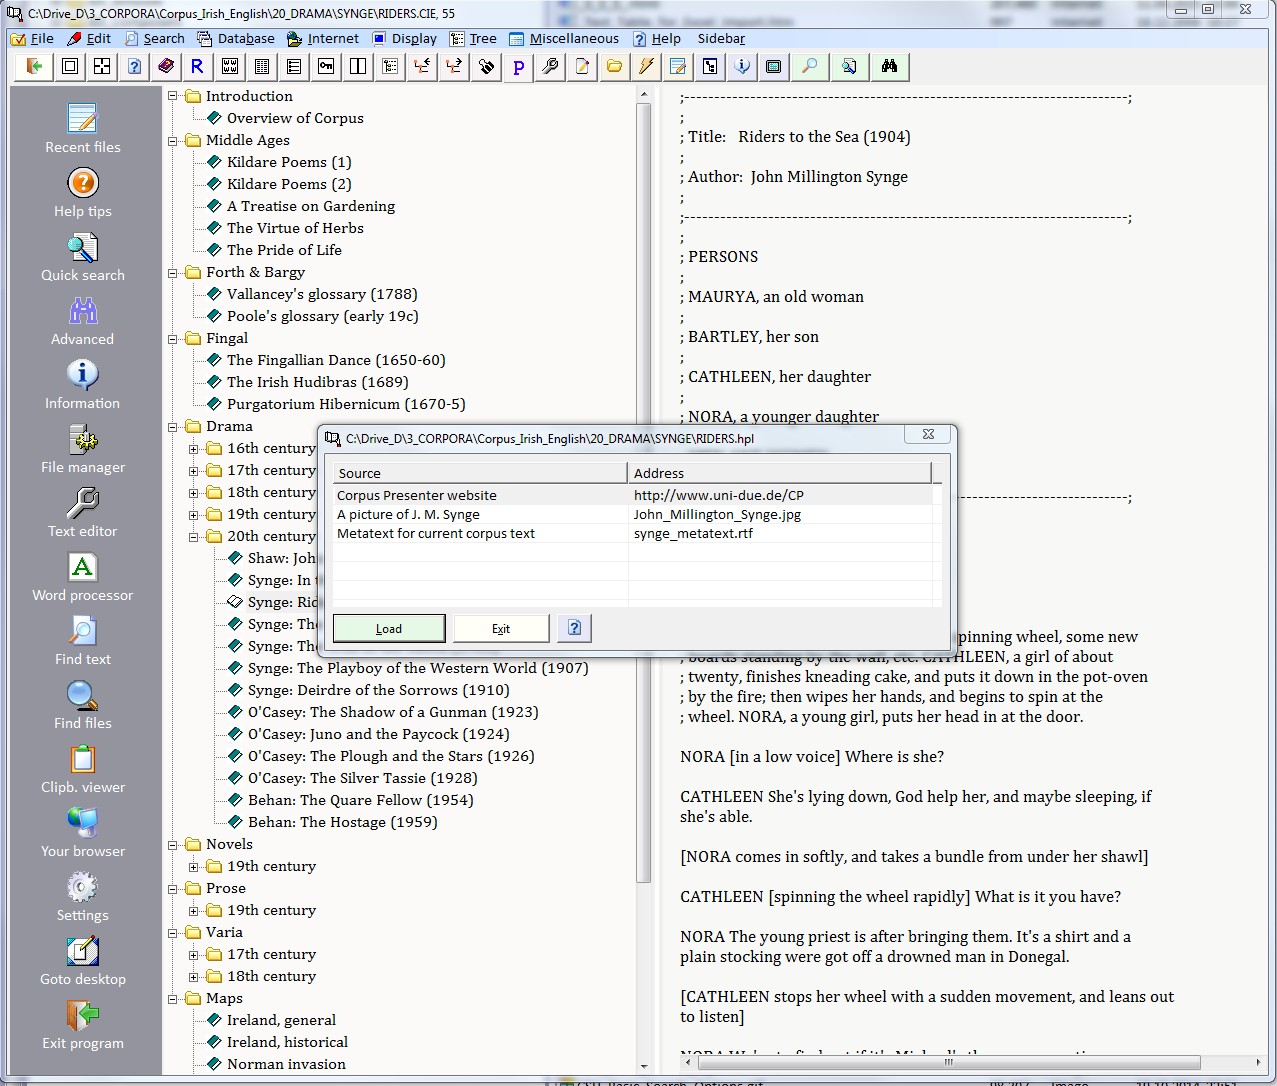
Each text of a corpus can have a set of hyperlinks associated with it. The way this works is as follows. For each text there can be a file with the same name but the extension “.hpl”. Corpus Presenter will read the contents of this file and you can then activate the hyperlinks option (via the right mouse button popup, the command button bar or the relevant option in the Edit menu on the top of the screen).
A small window appear with a grid in it. The grid is populated by those references contained in the hpl-file associated with a text. There are two columns in the grid, one is a text describing the source of a hyperlink and the second is the actual reference to the hyperlink. Typically, a hyperlink file will contain an internet address - a URL - which is activated when the user clicks on the row containing it. A grid row may also contain a reference to an image file which is associated with a corpus or indeed a further text file.
A hyperlink file is structured as follows: two lines are needed for each item, the first line is the description and the second the actual reference, like the following example which matches the file RIDERS.CIE (Riders to the Sea by John Millington Synge in the branch \Drama\20th century in the supplied A Corpus of Irish English).
| Corpus Presenter website | http://www.uni-due.de/CP |
| A picture of J. M. Synge | John_Millington_Synge.jpg |
| Metatext for current corpus text | Synge_Metatext.rtf |
| Desktop menus |
| 1 File |
1.1 Open a dataset... This option displays the files of a directory (the default directory of Corpus Presenter or that which you were in when last working with the program). You can choose a control file to start working with a new dataset or press ESCAPE to return to the one you were just processing.
Shortcut: Ctrl-O
A dataset file is a small text file (without any formatting) which contains all the information necessary to display a corpus correctly in tree form from within Corpus Presenter. A dataset is the collection of files (texts and possibly images and sound files) which is displayed in tree form on the left of the screen. A dataset file always has the extension .CPD.
1.2 Create/edit a dataset It is possible to design your own corpus from within Corpus Presenter. This is done via the current option which loads the supplied program Corpus Presenter Make Tree (see help text for this program). Once you have designed a dataset file for a corpus and saved this to disk, you can load the corpus using this file.
Bear in mind that you can generate a dataset file with the program Corpus Presenter Make Tree which will make a dataset from any group of selected files in a directory listing.
Shortcut: Ctrl-N
1.3 Information on current set Displays a windowful of information on the dataset you are currently processing.
Shortcut: Ctrl-I
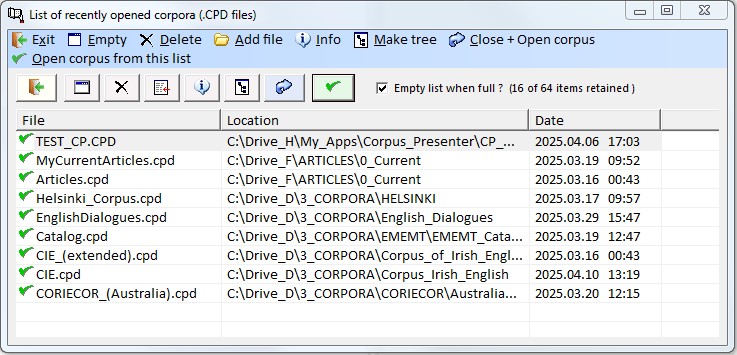
1.4 Show recent files Any corpus dataset file, which you have loaded in Corpus Presenter, is registered and its name is kept in an internal list which is displayed with the current option. Just move to the file you wish to load (representing the corpus you wish to process) and press RETURN or double click with the left mouse button. There are a number of further options from this window, e.g. you can add, delete or edit corpus dataset files as you wish.
Shortcut: F5
1.5 Load text file(s) directly If you do not have a dataset file for a corpus or if you simply wish to process one or more text files directly, then you can do so with the current option. You choose a file from a directory listing and this is then displayed on the right of the screen. If you have selected more than one file (by pressing the Ctrl-key and marking items in the file list) the first of the group is displayed. There are as many nodes in the tree as files which you selected. In each case the node label is the full path of the particular file. Note that you can load HTM, RTF and plain ASCII files directly from within Corpus Presenter.
Shortcut: Ctrl-L
1.6 Save list of files to dataset With the current option you can save the names of the currently loaded files to a dataset file with the extension .CPD. If you do this then you can load this set of files by simply selecting the CPD file the next time you choose to load a dataset.
N.B. This option only works when you have loaded a number of files directly. If you have already loaded a dataset file (one with the extension .CPD) then you obviously do not need to save this as it already exists on disk.
Shortcut: Ctrl-S
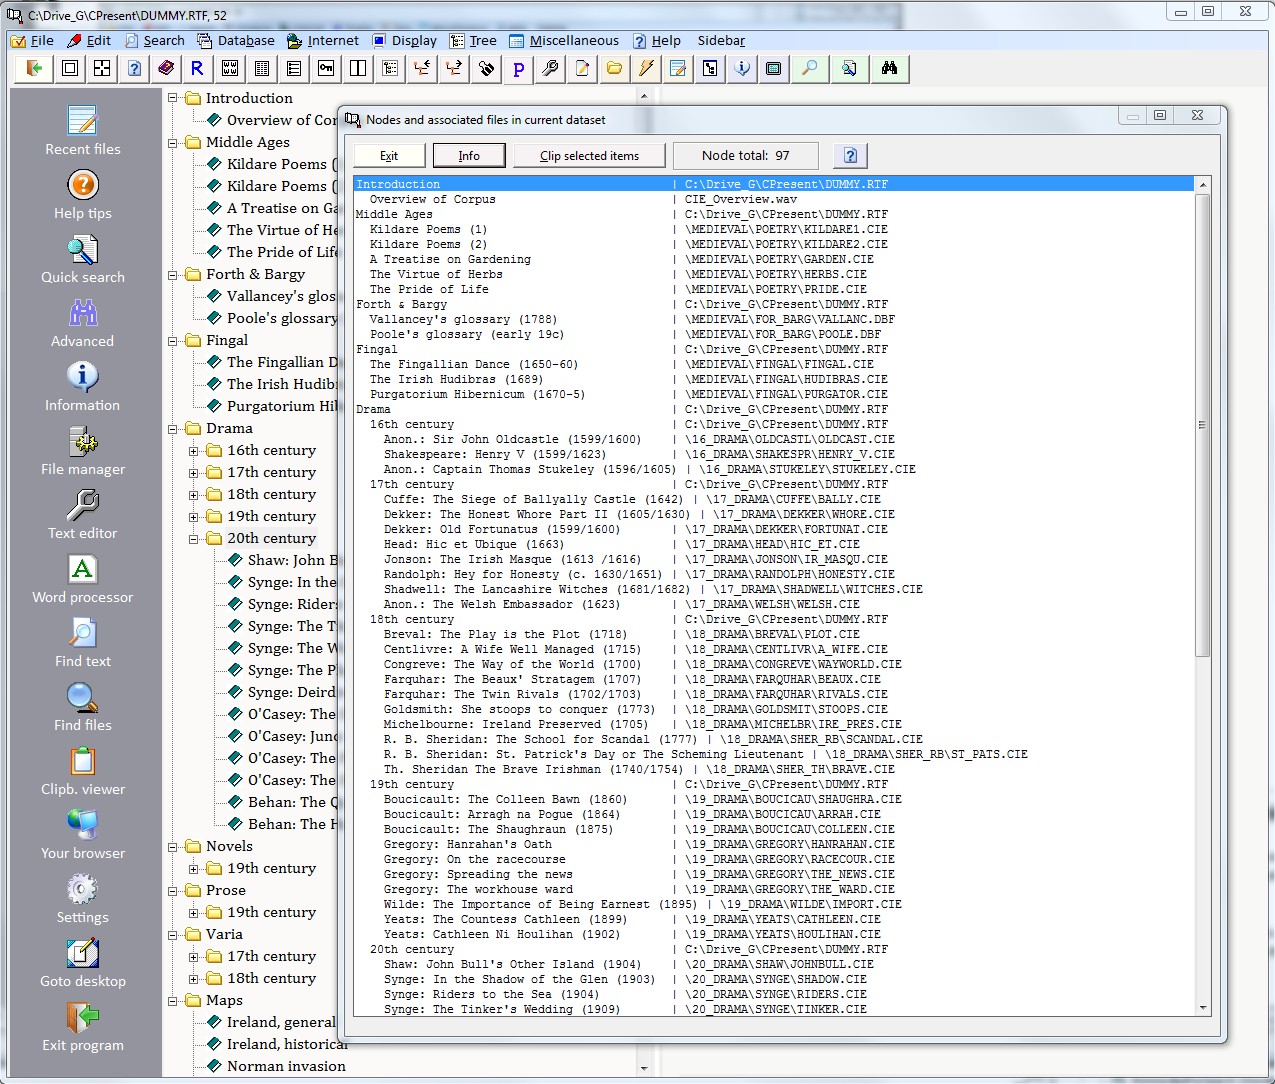
1.7 Nodes and associated files in set An important part of the work with Corpus Presenter is determining what files are to be linked with what nodes in the tree which is the visual representation of the current dataset. The present option allows you to check online what files are associated with what nodes. To alter the settings, edit the control file directly and store this to disk. Now re-load the control file by choosing a new dataset. The changes are reflected in the links between nodes and files at the points you altered.
Shortcut: F8
1.8 Copy tree to text buffer Puts a copy of the current tree into an internal buffer which can be retrieved in any text editor, such as Corpus Presenter Text Editor via CTRL-V.
1.9 Settings A window is shown here in which you can specify the values for an array of parameters. All the values you determine here are save to disk in the initialisation file for Corpus Presenter and so are maintained across work sessions.
Shortcut: F3
1.10 Directory lister With this option you simply activate the directory lister. This is a level on which you can view, copy, move, duplicate and delete files. A loaded corpus is not affected and the options No Load and Retrieve are deliberately disabled.
1.11 Output file directory Here you can specify the directory which is to be used for storing the output from any operation within Corpus Presenter. For instance, if you generate a word list or have a set of finds for a search string, then you may wish to save these to disk. It is sensible to use a directory which is not the one where the primary files of the corpus are located. The directory you choose here will be used for saving outputs (and re-loading such outputs) until you change the value at some later date. The output file directory can also be set from the directory lister level (see previous option), irrespective of how you get there.
Shortcut: Ctrl-Shift-F3
& A directory lister is a module contained in many programs of the Corpus Presenter suite. It not only allows you to select a file for processing, but also to view, copy, rename or delete any files on any drives of your computer.
Shortcut: F2
1.12 -Windows desktop This command will move you to the Windows desktop by hiding all open windows of any loaded programs. This allows you to access any icons you may have on your computer desktop. To return to Corpus Presenter, use the Alt-Tab key combination to move to its window.
Shortcut: Ctrl-Shift-F6
1.13 Exit program Unloads Corpus Presenter after user confirmation.
Shortcut: Alt-F4
| 2 Edit |
2.1 Undo Allows you to undo the last deletion.
Shortcut: Ctrl-Z
2.2 Redo Permits you to cycle through the last formatting moves.
2.3 Select all Highlights all of the current text.
Shortcut: Ctrl-A
2.4 Copy Deposits the currently selected text in the Windows buffer.
Shortcut: Ctrl-C
2.5 Paste Empties the contents of the Windows buffer at the current position in the text.
Shortcut: Ctrl-V
2.6 Cut Moves the currently selected text into the Windows buffer.
Shortcut: Ctrl-X
2.7 Delete Deletes the selected text.
2.8 Load associated text for current file It is possible to specify the name of a text which you can load and have displayed in a window when you press F6 or select the current item in the File menu. This option is useful if there is some text file which you would like to have access to from within Corpus Presenter at the touch of a button. You can choose a new file via the option Get file from disk in the menu bar of the text box which opens. Corpus Presenter will remember this file and load it again when you activate this command.
Shortcut: F6
2.9 Information on current file Here a window with information on the text associated with the current node is displayed.
Shortcut: Shift-F6
2.10 Word count for current file This option will do a word count for the currently highlighted text in the tree / list on the left and display the results in a text window.
Shortcut: Shift-F9
2.11 Hyperlinks for current text Each text of a corpus can have a set of hyperlinks associated with it. The way this works is as follows. For each text there can be a file with the same name but the extension ‘.hpl’. Corpus Presenter will read the contents of this file then you activate the hyperlinks option (via the right mouse button popup, the command button bar or the relevant option in the Internet menu on the top of the screen).
A small window appear with a grid in it. The grid is populated by those references contained in the hpl-file associated with a text. There are two columns in the grid, one is a text describing the source of a hyperlink and the second is the actual reference to the hyperlink. Typically, a hyperlink file will contain an internet address – a URL – which is activated when the user clicks on the row containing it. A grid row may also contain a reference to an image file which is associated with a corpus or indeed a further text file. See the example given above.
Shortcut: Shift-Ctrl-F12
2.12 R workspace Here a window opens in which a text is displayed which consists of input for the programming language R. You can deposit the results of searches as vectors for R (lists which R can take as input for data visualisation). The contents of the text in the R workspace is loaded automatically when the window opens and is saved automatically when you close the window. You can choose your own file name and location for the workspace text file (an R history file) by choosing Save and then specify name and place for the file to be saved. Note that there is a special help file for the R interface accessible by clicking on the help symbol in the R module (or choosing the relevant option on the top line of the window).
Shortcut: Shift-Ctrl-F5
2.13 Open current file with... This option lead to a list of programs being shown in an extra window. You can choose any one you wish to load the file associated with the current node of your corpus tree on the left of the screen.
Shortcut: Alt-Backspace
3.1 Finding strings Allows you to search for a string in one or more texts which are contained in a dataset. Obviously, only searches through text files are permissible. This option initiates a dialogue in which you specify what string you wish to look for. This window also allows you to specify the range of a search, to gather finds in a list and store these to disk.
Shortcut: Ctrl-F
3.2 Quick search through files This is the simplest type of search which allows you to look for any string in the currently loaded text or in any files in the tree on left. The option is quick and easy but quite powerful, for instance, if you choose an automatic search through all files you can comb through your whole corpus quickly with the results deposited in the Windows clipboard from where they can be retrieved via the Paste option of word processing software, including the internal text editor of Corpus Presenter.
Shortcut: Ctrl-Q
3.3 Find string in tree If there are many files in your corpus, you may wish to search for a string contained in one of the node labels of the tree on the left of the screen. The present function will do this for you. Each time you search, the program starts at the next node following the present one so that you can proceed through the whole tree if you wish.
Shortcut: Ctrl-T
3.4 Make a concordance The current option offers a simple but powerful means of viewing all words (tokens) contained in any set of files in a single list. All you need do is specify the range of files and a few other parameters. Importantly, concordances should be generated using a stop word list to avoid the output lists becoming too unwieldy. The concordance lines are returned in a grid and by clicking on any row you can view the position in the text from where the particular word (token) is to be found. (For more information, see the dedicated section below).
Shortcut: Ctrl-F3
3.5 Make a word list You can generate lists of words from the text files of a corpus. At a maximum, you can create a word list of all words in all text files of a corpus. This would take some time for a large corpus and is unlikely to be the aim of most users, but can be done on occasions of course. Instead users are probably interested in creating a list of selected words in a corpus. For this reason, one of the first options in the input window which opens on selecting this command is Input word list. Here you specify a plain ASCII file which consists of a list of words, one on each line. Such a word list can be easily created with Corpus Presenter Text Tool. The next item to remember, and which is concerned with restricting the words used for a list, is a stop word list. Essentially, this is a list of words (again in the form of a plain ASCII file) which are to be excluded from word list generation. For instance, if you choose to make a word list of an entire text, then it is unlikely that you want to have statistics on the occurrence of such common words as a, the, on, at, etc. These and similar words can be excluded by putting them into a stop word list and then specifying it on this level of the program.
Shortcut: Ctrl-W
To generate a word list Corpus Presenter examines a file or files, extracts all words and places each of these on a separate row in the grid which you see in the word list window. Each word is only entered once into the grid. The number of Cambria a word occurs in a file is recorded in the frequency column.
When saving the results in the grid to disk you can choose to have these deposited in a plain text file or in a database (for further processing with one of the supplied database editors). You can also just select rows in the grid and then store only the contents of the selected rows (an extract of the entire grid so to speak). To select contiguous rows, hold the Shift-key depressed and mark the rows by moving with the up or down arrow key. To select non-contiguous rows, hold the Ctrl-key depressed and move from row to row with either the up or down arrow key. To select a row, press the SpaceBar (without releasing the Ctrl-key) or click on the row with the mouse.
Generating a word list is a somewhat slow process as the entire text must be combed through for each word. But it is something you can initiate and leave the computer to work away while you do something else. Note the option of generating a word list for the checked files of the current corpus tree. This option can be used to ensure that all the files you want to encompass are included in the operation.
Examples of a word list, based on input forms with the legal wild cards * and ?
Note that the question mark stands for a single unspecified character and the asterisk for several unspecified characters. The results given here can be repeated by selecting the text RIDERS.CIE (Synge’s Riders to the Sea) which is contained in the test corpus supplied with Corpus Presenter.
When you are deciding how returns are to be displayed you can choose between a plain list (which just includes the word and the frequency) or a grid. The latter is much more flexible and you can decide how many of five fields are to be included. The first one, Word, is obligatory, but the others can be determined by the user. If you choose to have the field Location then the search is liable to be slowed up if there are a lot of finds for each word. The reason is that the program now records the location in each text of all the finds. When looking for rare forms, this option can be very useful. So use prudently.
Range of files for a word list
The range of a stop word list covers the four possible types: 1) From first file, 2) Branch only, 3) Just current text, 4) Checked files. These four ranges are also available when retrieving data from files in your corpus. The first three options refer to a section of the tree on the left of the screen, i.e. the entire tree, a branch or a single node. But there are cases where the files to be encompassed cannot be referenced by a section of a tree. In such cases what one does is to change the tree display to a list-type display (this can be done via the option Tree or list display in the Display men, shortcut: F11). Now you can check files of your corpus as you wish. When the selection is made you activate the word list window again and proceed. The remaining parameters are discussed briefly below.
Keep punctuation Determines whether punctuation, found typically after a word, is included in the list generated.
Case differences If this is off (the default state) then all words put in the word list are converted to lowercase beforehand. However, if you tick this box then the case of finds is maintained in the output word list. Note that this can mean that the first instance of a word is with a capital letter and others with small letters are counted as instances of this. For instance, the first instance of THE may be written The and will be registered as such. Further instances may be written the and will nonetheless be regarded as instances of THE.
Put file name in output If information on the file from which words stem is important then you should click on this parameter. If you include this information then you can later extract the words stemming from a particular file.
Get input word list Here you select an input word list from a directory listing.
Get stop word list The same command, this time for a file containing stop words.
Save as word list There are two basic means of saving word list returns to disk. The present one is the simplest: it will just save them as a plain ASCII file which can be loaded afterwards with any word processor or text editor.
Save as database The second means of saving is as a database. This is a table with information arranged in the form of rows (records) and columns (fields). You cannot load a database directly with a word processor or text editor. Instead you must use a database manager like Corpus Presenter Database. It may require some getting use to but the advantage is one of much greater flexibility in the manipulation of data as you can access individual fields and records and extract data from these and arrange it afresh.
The database generated will have seven fields which correspond to the label in the word list window on the right of the screen.
Statistics Assuming that a search has been done, this option will display the returns for the files examined, i.e. the number of unique forms, the number of words and the number of files.
Comment character There may well be lines which you do not want to have examined during word list generation. If these are preceded by an unambiguous symbol then you can enter this as comment character here and have such lines ignored.
Window This command will expand the word list and use the entire window for display. The option is a toggle so that clicking on the button again will revert to the previous state.
3.6 Search via word list extract This option provides a comfortable means of viewing the passages in any text which contain words from a list. The way one uses this function is as follows: first generate a word list from any text or texts using the Make Word List (see previous command). Save the list generated to a disk file making sure that you include information from all fields when saving the list (the information on locations of words in files is essential for the current function to work properly).
Once a list has been made, start the present option and choose the option Load word list (on the top of the window). Select the list from the directory listing you are presented with. The list is loaded and the grid now displays information on each word form. Click on any word (or choose the option Show tokens on the top) and the screen changes. The list you see on the left contains all the occurrences of this word in the texts from which the word list was generated. Move up and down the list to view the locations of this form in the texts in which it occurs. You can copy out anything you wish from the text displayed on the right.
3.7 Keyness in texts This term has gained a specific meaning in recent years by which it refers to the extent to which a text or texts show a specific stylistic profile when compared with another set of texts. Specifically, the term has been used when analysing the lexical profile of an author or author(s) in direct comparison with that of another group. By this means it has been possible to show how the style of an author or authors is distinctive vis a vis others of his/her time. This distinctiveness is the ‘keyness’ of the texts by the individual(s) in question. ‘Keyness’ is quantified by measuring the positive or negative difference in the lexis of author(s) vis a vis that of those in a reference corpus with which the former are compared.
For more information, see dedicated section below.
Shortcut: Ctrl-F6
3.8 Analyse lexical clusters Virtually any text will show recurring word patterns which may not be obvious at first sight. Here text processing software like the present program can be useful. With the current option Corpus Presenter Text Tool will comb through any text and break it down into segments consisting of between 1 and 8 words and then lists these segments with their frequencies. Such a breakdown is useful when analysing the style of an author or when examining typical collocations in a language. The following illustrates the principle with chunks of three words at a time. There are many options at your disposal with the current command, for instance you can view clusters alphabetically or by frequency and you can display the context in which each occurrence was found. Results can be saved in a user-specified manner as a text or a database.
For more information, see dedicated section below.
Shortcut: Ctrl-U
3.9 Subsection of file names A further means of restricting a search is to enter here a section of a file name which must be present for a text with this file name to be searched through in any retrieval operation. For instance, if you have a subset of files in your corpus which have the opening characters 20c_ for 20th century texts, then you could specify this as a subsection of file names necessary for searches to be carried out.
3.10 Goto storage area There is a text editor window incorporated into Corpus Presenter which functions as storage space when you are collecting returns from various types of retrieval. This storage area can be accessed from any level of the program and you can add, delete, copy, move, paste any text to or from it as well as carry out certain basic types of formatting tasks. The text in the storage area can be stored to disk as a Rich Text Format file (with the extension .RTF) and hence be loaded into virtually any commercially available word processor on any operating system.
Shortcut: Ctrl-G
3.11 Show last statistics Assuming that at least one search has been done, this option will display a window with the information from the last retrieval operation.
Shortcut: Ctrl-Shift-F12
4.1 Load a database There is an inbuilt database editor in Corpus Presenter, which offers users most of the options which they require for daily work with databases. This means that you do not need to load the Corpus Presenter Database every time you wish to make a small alteration to a database in a corpus. The various options of the internal database editor are explained in detail in the section How to use the database module below. Shortcut: F4
4.2 External database editor This option will load the supplied database editor Corpus Presenter Database. When you conclude the work session with the latter program an automatic return to Corpus Presenter is made.
Shortcut: Shift-F4
4.3 Make a new database With this option the supplied program Corpus Presenter Make Database is loaded and you can create a new database with it, starting from scratch or using a model database as you do so (see description below).
4.4 Locate string in database If the corpus you are processing contains databases then you can search for strings in these also. The function for this is to be found in the search menu. The way it works is as follows: Corpus Presenter looks for a database in the list of files for your corpus. When one is found the program reads in the structure and displays the locate function window with the fields of this first database shown in a list on the right. You may choose a field to search through, or you can demand that all fields of a database are combed through. The best results are achieved if all databases have the same structure.
4.5 Extract records from databases It is possible to extract any subset of records from the databases of the currently loaded dataset by specifying a filter condition which the records are to meet to be included in the extraction process. The filter is constructed in the same manner as when you are processing a single database. You must furthermore enter the name for a database which is to receive the extracted records. This can be a new database or an existing one. If the database already exists then you can choose between overwriting it or just appending records at the end of the database file which you would do if you wish to preserve the previous contents. If the current dataset does not contain any databases there an error message is issued. If the dataset contains media files of different types (texts, graphics, sound files, databases) then only the databases are affected by the current option. By definition databases are those files with the extension .DBF.
4.6 Output all databases as text The purpose of the current option is simply to put all the information in a dataset at the disposal of users in text form. The output file which is generated is always a Rich Text Format file (to ensure that formatting is preserved) with a name which the user specifies. On completion you can load the output with your own program (see option Your program in 8. below).
For more information on the database module in Corpus Presenter, see dedicated section below.
5.1 Load your browser With this command a small window opens in which the name of a browser can be found and which you can load by pressing OK. The name of the browser you choose is retained across work sessions, until you may change it later.
Shortcut: Alt-B
5.2 List of websites Corpus Presenter maintains a list of websites which you might like to visit, e.g. to check on an online corpus or text source. The present option will open the website window. You can add, edit, delete entries as you wish and then save the list to a name of your choice; this name will be used in future work sessions until you change it at some later stage.
Shortcut: Alt-W
5.3 Corpus Presenter website Here the internal browser is used to load the dedicated website for Corpus Presenter at http://www.raymondhickey.com/index_(CP).html Much information relevant to the understanding and use of Corpus Presenter can be found on that site.
5.4 Supplied browser This option will activate the supplied web browser of the eprogram suite. There is a history function and a list option with which you can maintain a list of the website addresses you might want to visit. Note that the browser has deliberately been kept small so as not to use up space and resources. For more complex internet websites, please use a commercially available browser. The latter can be specified with the option Load your browser above.
5.5 Internet file editor There is a text editor – Corpus Presenter Internet Editor – supplied with the current program which is intended specifically for editing internet files which are formatted according to the Hypertext Markup Language specifications. For instructions on how to use the editor, consult the online help contained in the program.
5.6 List fields in text There is a text editor – Corpus Presenter Internet Editor – supplied with the current program which is intended specifically for editing internet files which are formatted according to the Hypertext Markup Language specifications. For instructions on how to use the editor, consult the online help contained in the program.
Shortcut: Ctrl-Insert
6.1 Set screen size Here you can set the size of your screen by choosing from a selection of different values.
Shortcut: Ctrl-Shift-F2
6.2 Reset division of screen The divider of the screen – horizonatal or vertical – can be moved by holding down the left mouse button when on the divider bar. Sometimes, you might want to reset the screen division to 50-50 for both elements in the window so this option will do that for you.
6.3 Adjust sidebar width. The width of the sidebar can be adjusted to fit the resolution of your screen with the present command. The value is stored in an initialisation file and maintained across work sessions. Note that there is a single option on the right of the top row of the screen Sidebar, this allows you to switch the sidebar on and off, as you wish.
Shortcut: Alt-Shift-F7
6.4 Switch tree <> text This option (see key short) will switch the focus from the tree to the text window, then to the sidebar and back to the tree again. This case be useful if you don’t have a mouse to hand.
Shortcut: Ctrl-Alt-S
6.5 Tree or list display There are two basic means for displaying the structure of a corpus with the present program. Either you use a multi-level tree (default) or an indented list. The second option shows the labels in the upper half of the screen with levels indented. The corpus text files are displayed in the lower half of the screen. You can toggle displays to and fro. Note that with some options, the display reverts to the default tree mode automatically.
Shortcut: F11
6.6 Toggle full/divided screen When a text file is associated with a node you may find it appropriate to use the entire screen to display the text. This command is a toggle and so switches back and forth between the two display types.
Shortcut: F12
6.7 Toggle full/divided screen When a text file is associated with a node you may find it appropriate to use the entire screen to display the text. This command is a toggle and so switches back and forth between the two display types.
Shortcut: F12
6.8 Check all files With this option you can check all files in the current list.
Shortcut: Ctrl-Shift-F11
6.9 Check files by name match Here you can enter a name or part of one (with wildcards allowed) and Corpus Presenter will search through the present list and check those files which match the string you enter.
Shortcut: Shift-F12
6.10 Remove checks from file list This option is the mirror image of the previous one and will remove all checks after user confirmation.
Shortcut: Shift-F11
6.11 How many files are checked? This option will simply display the total number of checked files.
Shortcut: Shift-F11
6.12 Copy checked files to output folder Assuming the display of files is in the List Mode any checked files can be copied to a new folder with the current option. The default folder is the output folder which can be specified in the File menu. You can, however, choose a new folder to use for file copying.
Shortcut: Ctrl-F11
6.13 Store selection as file If you go to some trouble to check files in a list of corpus files you might want to keep this set of checks for later work. You can do this by storing the selection to a file (with the extension .SEL).
Shortcut: Ctrl-F1
6.14 Get file with selection Assuming that you have stored a file selection at some previous time, via the previous option, you can now load such a selection file and the files checked on that previous occasion will now be checked. That way you can maintain selections of files across work session.
6.15 Show text in separate window The present option loads the text which is currently displayed on the desktop in a separate window from which you can undertake certain steps, such as toggling markup up on and off or saving the text under a different name, etc. This function is also available on the Finding Strings and Quick Search levels.
Shortcut: Ctrl-F5
7.1 Collapse tree to left When Corpus Presenter is loaded, only the nodes on the first level of the tree are displayed (for the sake of clarity). If you have expanded the tree and wish to reduce the number of levels shown then you should choose the current option.
Shortcut: Alt-Shift-L
7.2 Expand tree to right The opposite movement is the expansion of a tree. By this is meant that more and more levels are displayed when you choose the present option. Note that you can achieve the effect of the present and the previous options via dedicated keys or the toolbar on the top of the screen.
Shortcut: Alt-Shift-R
7.3 Size of tree branch Returns the number of files contains in the current branch of a tree.
8.1 Open internal text editor There is a small text editor included in Corpus Presenter with which you can takes notes while working with corpus files. The commands of the editor are a subset of the supplied word processor Corpus Presenter Word Processor. This text editor – termed here a jotter – can be used as a repository for the results of a retrieval operation, for instance if you choose to export results to an RTF text table on the retrieval level. From here the data can be copied to your own word processor by simply selecting text and depositing it in the Windows clipboard.
Shortcut: Ctrl-E
8.2 Load text database editor Here the supplied text database of the Corpus Presenter suite is loaded. With this program you can edit and manage the text databases which can be outputted from the Finding Strings level. By these means you can maintain several ouput text databases with differing information and process these any time you wish, independently of Corpus Presenter.
8.3 Load external text tool The text editor of the Corpus Presenter suite – CP Text Tool – is loaded with this command. The editor has a range of options which make it useful for editing non-formatted texts, i.e. ASCII files. It is also ideal for editing large corpus files directly. The text editor can, however, handle both plain ASCII texts and Rich Text Format files.
Shortcut: Ctrl-J
8.4 Run word processor There is a supplied word processor with Corpus Presenter which can handle RTF, HTM/HTML and plain text files and which is loaded at this point. You can use the Corpus Presenter Word Processor to process the files of a corpus if you wish. It is also useful for editing the results of searches which you may choose to save to disk.
Shortcut: Ctrl-K
8.5 Clipboard viewer A utility is supplied with Corpus Presenter which will store up to 12 sets of contents of the Windows clipboard in a set of 12 text boxes from which you can retrieve any set of contents. You can also hold sets of contents in a single file. Both the text boxes and the single file of cumulative clipboard contents can be saved to disk. The utility is call Corpus Presenter Clipboard Viewer and can be loaded here.
Shortcut: Ctrl-F2
8.6 Run Screen Capture There may be cases where you wish to capture the current contents of the screen, e.g. when viewing statistics from a search in graphic bar form. This can be done with the current utility with which you can then save the graphic contents to disk as an image file.
8.7 Load file manager Here a supplied utility of the current program suite is loaded. With this you can also carry out most housekeeping tasks such as incremental backups of your files to an external disk and can view, copy, move and delete files flexibly, to mention just a few of the more obvious options of this program.
Shortcut: Ctrl-M
8.8 Calculation options Activates the internal calculator in Corpus Presenter which has a variety of options. Any calculations done here can be stored in the Windows clipboard and imported into the internal text editor if required.
8.9 Run calculator This option loads the calculator utility supplied in the Corpus Presenter suite which has some more options.
Shortcut: Ctrl-F8
8.10 Run List Processor This option will load the program Corpus Presenter List Processor which allows you to manipulate lists in various ways. The program has three lists which can be used for the intake or depositing of data. The first two are input lists and you may copy information into the lists by either loading a file from disk or by copying suitable data from the Windows clipboard.
8.11 Show calendar Displays a calendar with a variety of date and time formats.
8.12 Show clock Displays the current date and time in the centre of the screen.
8.13 Show wallpaper An image can be displayed by Corpus Presenter which fills the screen and hides all other windows. This is technically called a wallpaper image because it covers the entire surface of the screen. The effect is like a screen saver and may be useful if you wish to conceal the present work surface.
Shortcut: F7
8.14 Your program This option allows you to load a program of your choice. When this terminates an automatic return to the outset is made.
Shortcut: F9
8.15 Custom function The program you wish to run via F9 can be specified at this point. The name and full path of the program are stored in the initialisation file so that you do not need to repeat this procedure for each work session.
9.1 Help text Here you can load the help file. By means of the table of contents you can jump to the section which is currently of interest to you.
Shortcut: F1
9.2 Frequently asked questions This option open a window with a large text file in which some of the questions, which I envisage beginners with Corpus Presenter having, are answered.
Shortcut: Shift-F1
9.3 Help tips This option shows you a window-ful of further options, those which are likely to be those most commonly needed by users of Corpus Presenter. the Help tips window can also be requested to open automatically on startup allowing you to pick the option you might need when working with your corpus files (see Settings, shortcut: F3, to set this value).
Shortcut: Ctrl-H
9.4 Goto corpus directory A Windows Explorer window is opened with this command and the directory where the present corpus is located is automatically logged in.
Shortcut: Shift-Ctrl-F1
9.5 Explore home directory Similar to the previous command but in this case the home directory of Corpus Presenter is logged in.
Shortcut: Ctrl-Shift-F7
9.6 About this program Displays a small text about Corpus Presenter. This window also contains information about the current release of Corpus Presenter (present Version CP 2026, Build: 3.0, June 2026) and about the author.
9.7 Removing Corpus Presenter Here a window is displayed explaining the three short steps necessary to remove the entire Corpus Presenter suite from your computer.
NOTE Certain options are only available when the tree on the left is visible. Equally, other options can only be accessed when the text window fills the entire screen. In addition, note that there is a toolbar at the top of the screen (if you have left it visible). To find out what commands the tools activate, place the mouse cursor over a tool and leave it rest for a second. You are then shown a ‘tip text’ which described the associated function briefly.
The Finding strings option is the main search function in Corpus Presenter. With this option you can comb through any number of texts for single or double strings and store the results to the Windows clipboard, an Excel spreadsheet, a database or a text file of your own. To search through texts using wildcards, click on the button Wildcard searches (this loads the Quick search option for this function, see description below).
You can enter a search string directly or use an input list just as with word lists and complex retrieval tasks. The list of returns allows you to select all items or only a subset (use the SpaceBar to enter or remove in the tick on the left of each row of the returns grid.
Statistics are shown in a separate window each time a search through texts is completed. Pressing the Escape key will cancel the search procedure.
A core feature of the Finding strings option is the possibility to search for two strings, i.e. which form a syntactic frame. This allows you to search for grammatical constructions in any of your files, availing of flexible parameters to improve returns as you carry out searches. Once the search is completed you see the returns. The finds for your search string(s) – assuming that there was at least one find – are displayed in a grid on the top half of the screen with the text from which the current find comes from shown in the bottom half. Note that the grid with returns is arranged as a number of fields: the find for a search with the left and right flank as separate fields. This allows you to sort returns by any of these fields. There are also three further fields – find location in text, file name and node label (from the corpus tree on the main level). These fields can also be used to sort a grid of returns.
Returns are reloadable and can furthermore be processed by Corpus Presenter Text Databases afterwards. The advantage of this is that the finds in the form in which they are returned can be stored to disk (as many sets of finds as you wish) and can be edited at some later stage.
There are three other ways in which you can view finds on the fly so to speak. One is to copy the finds to a text window. This leads to unstructured output, but you can view the finds more easily perhaps and can copy them by just selecting text and choosing Copy from the right button menu. The second means is to copy the cells of a selected column. To do this just click on the column heading. The entire column is selected and copied to a text window where you can select and copy text in the usual manner.
Output options for finds
Finds can also be copied to an Excel table permitting you to process the output with the Microsoft spreadsheet program Excel.
Finds can be exported to an HTML file in which the strings searched for are highlighted with a specific colour and the lines with finds are centred on screen.
Lastly, finds can also be copied to an RTF text table, i.e. any finds in a multi-line grid can be transferred to the internal text editor in Corpus Presenter.
Finds can be copied to a database (see dedicated section below).
See the section on Exporting data from Corpus Presenter below for more information.
Determine collocation
A variety of parameters can be set in various ways for complex string searches. The settings determine the behaviour of Corpus Presenter during searches on this level. A parameter is set to ‘on’ by clicking in the small box to the left of the text describing it. If set, a tick appears in the box. When this box is empty the parameter is not set.
1) Heed case during search If this parameter is not set then uppercase and lowercase letters are treated in the same manner, that is no distinction is made between capital and small letters. This also applies to any special symbols chosen from the list on the right.
2) List negative finds This option should be used with prudence as it will return all contexts which do not match the search parameters. For a corpus of any size, the results would be enormous and your computer would run out of memory at some stage. The option has only been included for those cases where users really know what they are doing and definitely require negative finds.
3) Double string search This type of search requires two strings, a first one, which represents the left-hand section of a syntactic frame, and a second one, which is the right-hand part. A typical example of a frame would be a phrase or part of a sentence. For instance, if you wish to search for occurrences of do plus have in historical texts of English, say in the Helsinki Corpus, then one might enter the following.
Syntactic frame search
Left-hand string do
This would return finds like do have, do certainly have, etc. You can furthermore specify whether either or both strings are entire words or only a part of a word, see below.
Special symbols Many corpora contain historical and/or foreign language texts and so you may well wish to search for a string/strings with special symbols in it. The list on the right of the screen allows you to access such symbols. Double click on any symbol and it is entered into the current string. Note the two option buttons below the symbols list. These allow you to specify which of the two input strings a chosen symbol is deposited in.
History When a search is carried out, the string/strings you entered is/are deposited in the history list which appears on the right of the screen. This list can be saved to disk and retrieved at a later point. You can also have more than one history list. When Corpus Presenter is loaded the list used last is automatically retrieved and its contents fill the history array.
4) Use input list 1; Use input list 2 Instead of simply entering a single item for string one or two you may wish to enter a number of forms. It may well happen that the string/word you are looking for – above all in historical corpora – occurs in more than one from. For instance, if you were looking at modal verbs in Middle English then you might want to treat mai, maie, may, maye, etc. as instances of ‘may’. This is done by creating an input list with all the possible spelling variants of ’may’ and then using this for string one. The same applies to string two; and of course you could have a combination of input forms for string one and for string two.
Using input lists will slow down the performance of Corpus Presenter slightly as it must check on not just two forms for a double string search but on the multiplication of the number of input forms in list one by the number in list two. With faster computers this should not be an issue, however.
5) Find across sentences A syntactic context which you specify for a frame search will probably occur within a sentence. For this reason you are given an option here which is ‘off’ by default. If you wish to deliberately search for a frame which straddles two sentences then set the current parameter to ‘on’.
The set of delimiters for sentences can be edited by the user (see the appropriate text box). For instance, if you were dealing with Spanish texts you would want to include the inverted exclamation or question mark symbols as possible sentence delimiters.
6) Allow spaces between strings 1 and 2 A frame search normally aims at returns consisting of several words, i.e. a phrase. However, it is equally possible to search for a word using a frame. For instance, if you wished to find all instances of negated adjectives in a text then you could enter a frame consisting of un and able and specify that intervening spaces are not allowed by removing the tick from the box for the current option. Such a search would return such tokens as unacceptable, unbearable, unthinkable, etc. You could also use an input file list for the beginning of such words. If you had a list with un, in, im, il and second list with able, ible then you would also find indescribable, impossible, illegible, etc. (see the supplied configuration file negations.cfg to try this out).
7) Number of intervening items If you are preparing a two string search then this parameter is of relevance as it determines how much material can occur between the first and second string for the context to be registered as a successful find. You can furthermore specify whether the intervening items are words or characters. The latter would be significant if the search strings are intended to be part of a single word for a successful find to be returned. If this parameter is set to 0 then the left and right sections of the frame must be immediately adjacent. The maximum number of intervening items (characters or words) is 64.
8) Amount of context returned When searching for strings, Corpus Presenter can return the context in which it occurred. You can determine how much of this is shown by specifying how many words to the right and left of the string are to be returned.
9) Return whole sentence containing find This can be useful to see what sentences embody a structure which you might be searching for. Bear in mind that a sentence is defined as a syntactic structure which is bound by a sentence delimiter. You can determine the set of such delimiters by editing the appropriate input line on this level of Corpus Presenter.
12) Find delimiters By default these consist of a left and right curly bracket. You can, however, enter any symbols you like which you feel might visually set off a search string in a return context.
13) String position in word This is a simple parameter which determines whether the units used for a search operation are entire words or only sections or indeed whether this consideration is relevant at all for a search. Basically you can specify that a string is to be treated as an entire word, the beginning or end of a word or specify that it may occur anywhere in a word, i.e. that its status as part of a word is immaterial for the pending search.
Bear in mind that Corpus Presenter uses mechanical means for determining if a string is a word, i.e. it looks to see if the string is preceded by a tab stop or a blank or is the first item on a line and then checks to see if it is followed by a blank, tab, comma, full-stop, colon, semicolon or is the last item on a line. The set of word delimiters can be determined by the user editing the list provided in the relevant text box in the search parameters window. This list is stored to disk and re-read in later work sessions.
The possibilities here can render a search, and hence the returns, more accurate. For instance, if you wished to search for the perfective construction of Irish English as in She’s after selling the car you could enter after as String1 and ing as String2 and specify that the position of the latter is at the end of a word. This would ensure that in a sentence like She’s after bringing the dog only the final ing is returned as a valid find for String 2. On the other hand you could choose the setting Beginning of word in a case like that discussed above under frame search. If you specified that do was only to be returned if found at the beginning of a word then cases would be registered like don’t which would allow for negated forms of do among your retrieval results.
There are five different range types for searches in Corpus Presenter. Their characteristics and relative advantages are as follows.
1) From first file. Starts at the first file and continues the search through to the last file.
2) Branch only. Assuming that the files of your corpus are arranged hierarchically as a tree, then this option allows you to search through only those files which are contained in a branch of this tree.
3) Just current text. The search is confined to the text which is currently highlighted in the left window on the main level.
4) From here to end. Starting at the currently highlighted file in the left screen on the desktop, the search will continue through all files from here to the end.
5) Checked files. There are two types of display for files in any corpus: (i) as a hiearchically organised tree (with branches and subbranches) or (ii) as a plain list of files. These two modes are termed the “Tree” and “List” mode respectively and you can toggle between then via F11 on the desktop or by using the relevant option in the “Display” menu. The advantage of the “List” mode is that you can mark files for searching which are not necessarily adjacent to each other or contained in the same branch of a tree.
On this level you can enter the markup codes which can be used to delimit such information as comments or other extraneous information in the texts of a corpus. Markup codes come in sets, i.e. there is a beginning code and an end code. These enclose some stretch of text. The enclosed text can be ignored during a search or not, depending on your needs. For this reason you need to specify three pieces of information for each set of markup codes: 1) the opening code, 2) the closing code, 3) whether Corpus Presenter is to ignore enclosed text or not. If you say ‘no’ here, then only the codes themselves are ignored, but not the text they enclose.
At the bottom of the comment code window there are two check boxes and an input box. The check boxes allow you to say whether comment codes are to be heeded during searches and whether lines which begin with a comment line indicator are to be ignored or not. The input box allows you to enter a comment line indicator.
The information you specify here is stored to disk and read automatically every time Corpus Presenter is loaded. This means that the codes, and whether enclosed text is to be ignored or not, need only be specified once. These settings will then be retained until they are changed at some later date.
You can have several sets of markup codes in disk files and load the one appropriate to your needs when working with Corpus Presenter. The program remembers the disk file which has been chosen most recently and uses this until instructed to do otherwise, i.e. by your loading a different file.
Note. On both the Finding Strings and the Quick Search level you can toggle markup codes on and off in the text window which shows the origin of the finds given in a grid. For this option to work you must have loaded a file with markup codes into the markup code window and have specified that these should be checked for during searches.
Searching with markup checking takes slightly longer than without as each text must first be stripped of all markup and then searched through.
Results of a search can be exported in Excel format or as a table with statistical information in HTML (internet file) format. The latter can be processed with most software, e.g. MS Word or the supplied Corpus Presenter Word Processor. The HTML file can also be viewed with any internet browser.
Cocoa headers
One means of specifying various items of information about a corpus text is to mention these in a header at the beginning of each file. A system which is quite widespread among corpora is the Cocoa parameter set. This consists of up to 32 parameters with typical settings for certain file types. For instance, the texts of the Helsinki Corpus are all encoded with a Cocoa header (using 26 parameters) in which information is given about a following text. The settings can be used in Corpus Presenter to determine what files are examined during a retrieval operation. The way this is done is outlined in the following.
To determine a setting you copy a Cocoa parameter from one of the text files of your corpus, say <V PROSE> or <X MALE>, into the Windows clipboard by marking the line and pressing CTRL-C when you are in a text program such as the Corpus Presenter Text Editor. Now move to the current window, click the text line at the bottom of the screen and retrieve the contents of the clipboard with CTRL-V. You then double click the position in the settings list on the right-hand side of the screen where this parameter belongs. Repeat this procedure for as many Cocoa settings as you require for the impending search. Settings which are empty will be ignored.
1 <B = ‘name of text file’>
NOTES The location procedure only applies to text files, not to images, sound files, databases (see below for this) or to dummy text files which are place holders for branch nodes without a specific file reference, e.g. a superordinate node to a group of texts.
The location function in this program is a facility which permits easy searching of texts. There are other programs which are more powerful in this respect and which allow searching for syntactic contexts. Such software usually requires that all the texts of a corpus are indexed prior to operation and is essentially different in design and purpose from Corpus Presenter which is intended to present all information in any chosen corpus in an easy-to-grasp, intuitive manner.
Settings may be gleaned from any text of a corpus by loading a text with a text editor and copying the setting value to the Windows clipboard and then retrieving it into the input line with Ctrl-V or via the right mouse button. Note that the line with the Cocoa parameter must be copied exactly as it is. For instance in the following example of a Cocoa header from the Helsinki Corpus you would copy <V PROSE> for the parameter <V = ‘verse’ or ‘prose’>. If you enter settings manually in the text input line, be sure that you type them exactly as the setting is to be found in the texts which Corpus Presenter will be examining.
Sample Cocoa header from the Helsinki Corpus (the text is a private letter from the early modern period)
<B CEPRIV3> Note: To activate the use of Cocoa settings during retrieval operations you must tick the appropriate check box in the top left-hand corner of the parameters window.
The statistics window consists of two sections. The top one is a plain text whose contents you can copy to the Windows clipboard. The second section (on the bottom of the screen) shows the statistics for the last search as a table which can be saved in various formats, including as an Excel spreadsheet, which can then be used as input to some other software.
If you remove returns manually from a list shown directly after a search you should re-calc the statistics for the returns to make sure that the figures reflect the altered list.
A negative find is common when searching for strings. The string may genuinely not be contained in the text(s) you examined. But it – or a string very like it – may indeed be present in your text(s). To help you determine if this is the case consider the following.
1) Check the spelling of the string searched for. You may have misspelled it.
2) Try using a list of input forms. This is helpful where there are spelling variants in your text (often found in historical texts).
3) Try using wildcards for the search, * or ?. An asterisk stands any number of unspecified letters whereas a question marks stands for just one. Note this option only applies on the Quick Search level.
4) Generate a list of forms using the Make a word list option in the Search menu on the desktop. Then create an extract of forms using this word list (use Search via word list extract in the Search menu). The forms you choose will be found as the word list you generated comes from the texts themselves. Be careful if you generate a word list from part of a corpus, then you can only search that part of the corpus with a word list extract.
Punctuation and sentence delimiters
During searches Corpus Presenter checks for punctuation and sentence delimiters, e.g. when determining what is a word or where a sentence begins and ends. To do this the program must know what characters it is to regard as punctuation. To determine what you wish to regard as punctuation and sentence delimiters go to the Settings window (shortcut: F3) and click on the button Delimiters, punctuation.
Parameters for searches
You can enter a search string directly or use an input list just as with word lists and on the Finding Strings level (for more information on both, see detailed descriptions of both these options). Returns can be collected and then transferred to the grid on the Finding Strings level, if necessary. The list of returns allows you to select all items or only a subset. With the latter you decide what items to select by either pressing the Shift key and then either the Up or Down Arrow key (to mark contiguous items) or by pressing the Ctrl key and then either the Up or Down Arrow key (to mark non-contiguous items).
Finds allowed across line breaks
This parameter is useful when searching texts for a phrase, i.e. for more than a word. The reason you might wish to allow finds across line breaks is that part of your search string might be contained at the end of one line and the rest at the beginning of the next line. By ticking the box Finds allowed across line breaks in the More search options window you force Corpus Presenter to remove all line breaks from a text. That is a line break cannot and will not occur in the middle of a complex search string and thus the latter will be found. The entire text, with all its line breaks, is now treated as a single line. So be careful not to have a comment line character as the first character of your text. If you do, the entire text is treated as a single comment line which is certainly not what you intend.
Pressing the Escape key will cancel the search procedure.
For further retrieval options, choose the option Finding Strings in the Search menu or just press Ctrl-F.
The wildcards * and ?, common in other software, can be used here to increase the flexibility of searches. The question mark stands for a single unspecified character while the asterisk stands for several of these. You can use more than one question mark to stand for more than one character, but only one asterisk is allowed as this stands for more than one character anyway.
There are no restrictions concerning the use of question marks, but users should understand how they work, so bear the following facts in mind.
1) A space, tab stop, page break, carriage return or line feed cannot normally be an unspecified character, and hence cannot be captured by an asterisk. The entry ‘h*r’ will return ‘harder’ (if present in the text(s) examined) but not ‘had their’ as there is a space between ‘h’ and ‘r’. However, it is possible to allow this by ticking the checkbox Spaces match wildcards. Caution should be exercised here because when wildcard searches are allowed to cross word boundaries, the results can be somewhat unpredictable and unwieldy.
2) A wildcard can be used as the last character in a search string, e.g. ‘he*’. This will return ‘he’, ‘her’, ‘head’ and ‘heather’ (assuming such words are in the text(s) examined). The string ‘he?’ will only return ‘he’ and ‘her’ but not ‘head’ or ‘heather’ as these words have more than one character after ‘he-’. In both types of search – with either ? or * – the program will search up to the following word boundary.
3) A wildcard can be used as the first character in a search string, e.g. ‘*ed’. This will return ‘laughed’, ‘coughed’, ‘seed’ and ‘bed’ (assuming such words are in the text(s) examined). The string ‘?ed’ will only return ‘bed’ but not ‘laughed’, ‘coughed’ or ‘seed’ as these words have more than one character before ‘-ed’. In both types of search – with either ? or * – the program will begin at a word boundary and search for the string within the word which follows.
The following table summarises the effects of using asterisks in search strings. Questions marks are much simpler as they simply stand for one unspecified character per question mark.
Note. For the above two types of searches the parameter Spaces match wildcards is irrelevant and cannot be set.
Note. Setting the parameter Spaces match wildcards to ON automatically turns String is word to OFF as the two are mutually exclusive. Any punctuation items which the user may have specified are ignored here.
For further retrieval options, go to Finding strings (see description in previous section) menu or just press Ctrl-F.
To generate a word list Corpus Presenter examines a file or files, extracts all words and places each of these on a separate row in the grid which you see in the word list window. Each word is only entered once into the grid. The number of times a word occurs in a file is recorded in the frequency column.
Bear in mind that word list generation is not sensitive to case, e.g. ‘The’ and ‘the’ are treated as two tokens (instances) of the same type. If you wish to search for strings with distinctions in case observed then use the Finding Strings or Quick Search options (see the relevant sections of this help file).
When saving the results in the grid to disk you can choose to have these deposited in a plain text file or in a database (for further processing with the internal database editor or with MS Excel, for example). You can select rows in the grid and then store just the contents of the selected rows (an extract of the entire grid so to speak). To select contiguous rows, hold the Shift-key depressed and mark the rows by moving with the up or down arrow key. To select non-contiguous rows, hold the Ctrl-key depressed and move from row to row with either the up or down arrow key. To select a row, press the SpaceBar (without releasing the Ctrl-key).
Generating a word list may be a somewhat slow process if entire texts are to be combed through for each word. But it is something you can initiate and leave the computer to work away while you do something else. Note the option of generating a word list for the checked files of the current corpus tree. This option can be used to ensure that all the files you want to encompass are included in the operation.
Examples of a word list, based on input forms with the legal wild cards * and ?
Note that the question mark stands for a single unspecified character and the asterisk for several unspecified characters. The results given here can be repeated by selecting the text RIDERS.CIE (Synge’s Riders to the Sea) which is contained in the test corpus supplied with Corpus Presenter.
When you are deciding how returns are to be displayed you can choose between a plain list (which just includes the word and the frequency) or a grid. The latter is much more flexible and you can decide how many of five fields are to be included. The first one, “Word”, is obligatory, but the others can be determined by the user. If you choose to have the field “Location” then the search is liable to be slowed up if there are a lot of finds for each word. The reason is that the program now records the location in each text of all the finds. When looking for rare forms, this option can be very useful.
Note: When making a word list from a very large file or many files at once it is advisable to use the plain list output option as this can take a large number of items and works somewhat faster. If you wish to combine lists then you can do so by clicking the box on the bottom-right hand corner of the screen. You can also leave this unchecked and later combine a mixed list to a unique list using the supplied utility Corpus Presenter List Processor.
Another approach to take when dealing with the same corpus on various occasions would be to generate a word list for the entire corpus in advance of working with Corpus Presenter. This can be done using the ‘Make word list’ function in the ‘Search’ menu. You can store the word list to disk and then load it into a text editor, that supplied with the current program suite, or the internal jotter or whatever, and then copy out the forms which you wish to search for by selecting words in the existing word list, then copying them to the Windows clipboard and choosing the option “Fill word list from clipboard” on the Finding Strings or Quick Search levels.
An extract from a complete word list can be made and then used for in the modules Finding Strings or Quick Search.
Note: Please consult the section on Sorting lists in the Troubleshooting section further down in this text.
A stop word list is a set of commonly occurring words which are to be excluded from a search operation. Such a list can be constructed with any text editor (such as the supplied one in the Corpus Presenter suite). A list consists of a number of words, each on an individual line which is terminated by a hard line-break (carriage return). If you specify that a stop word list is to be used remember that these words, if they occur in a text, will be removed before the text is examined. This may mean that a text (as it appears in the retrieval returns) may not correspond fully to the original text. You should only use a stop word list if it is the only means of avoiding wrong returns when examining a text. Using a stop word list does not in fact speed up retrieval. When you specify the use of a stop word list, and/or comments to skip, then the time taken increases slightly because initially stop words and commented text are removed from any text to be searched through.
The current function is accessed via the View locations by token option in the Action menu of the Word List module. For it to work you must have generated a word list already.
Move up and down in the list to see the locations of each token of each word. Use the right-mouse button in the text window below to copy text to the Windows clipboard if you wish.
Making huge wordlists
Before you try making a huge wordlist, say of all the files in a corpus, do a trial run with some files, e.g. those in a single branch of the corpus.
Make sure that checking for markup is turned ‘off’ when generating huge wordlists. Leaving this ‘on’ puts a great strain on memory and can cause your computer to hang.
When making a huge wordlist, do not request that the location of each find be registered, this again puts a strain on resources because for a huge wordlist there are obviously many locations for words and all of these must be kept in memory while the wordlist is being generated by Windows. Untick ‘Location of word’ in the ‘Field output options’ box in the window of settings which appears before you start making a word list.
It makes sense to use the option ‘Combine finds from files’ for a huge wordlist (typically made of all the files of a corpus). If you do not use this option then the resulting wordlist gets very large very quickly, assuming that your corpus consists of many files, because it makes a unique word list for every file it examines and then combines the result to the wordlist which is displayed at the end of the operation. Again, under unfavourable conditions, this can cause your computer to hang.
There is one restriction with wordlists, that is, that the resulting list contain not more than 256,000 items, i.e. unique words across the files of a corpus. If you combine finds from files this is more than ample (for instance, all the plays and sonnets of Shakespeare, taken together, contain fewer than 30,000 unique words with a total of just under a million tokens).
Tip. If you are generating a huge list and the mouse pointer has the form of an hour glass this does not necessarily mean that Corpus Presenter has hung. Check to see if your hard disk is being accessed (there is a little light for this on all computers). If this is the case it may be that it is just swapping data between memory and disk. Be patient and see if the program recovers and displays the final screen (a window with statistics) which indicates that the wordlist has been generated successfully.
A concordance is simply a list of words in one or more files. Although it is not selective in what it displays, a concordance can be useful in many cases where users wish to decide themselves what to do with the information contained in a corpus.
To allow for this approach Corpus Presenter has an option Make a concordance which can be activated via the entry in the Search menu on the desktop. Before making a concordance you must specify a number of parameters in a window which resembles that shown when making a word list (see above).
Note that you can make a concordance using an input word list. In this case only tokens of those words which are present in the input list will be returned (assuming that they are present in the chosen files of your corpus).
However, if you choose not to use an input word list, all tokens of all words in the chosen files will be returned. This can very quickly lead to a huge list of words. In order to make such lists manageable you are strongly advised to use a stop word list. This is a small text file listing those common words which you wish to exclude from the list which is generated. A concordance can be reduced by at least 50% by just excluding about 20 common words of English (or doing the same for other languages for that matter).
Corpus Presenter can manage a concordance with up to 2 million tokens (arranged as lines in a grid). Whether your computer can manage that number is a different matter. You should try making some concordances and see if the returns can be handled. Make sure when you are generating concordances that no other programs are currently loaded as these will reduce the amount of computer memory available to Corpus Presenter.
This term has gained a specific meaning in recent years by which it refers to the extent to which a text or texts show a specific stylistic profile when compared with another set of texts. Specifically, the term has been used when analysing the lexical profile of an author or author(s) in direct comparison with that of another group. By this means it has been possible to show how the style of an author or authors is distinctive vis a vis others of his/her time. This distinctiveness is the ‘keyness’ of the texts by the individual(s) in question. ‘Keyness’ is quantified by measuring the positive or negative difference in the lexis of author(s) vis a vis that of those in a reference corpus with which the former are compared.
Examining texts for ‘keyness’
Word lists from two sources with combined output (lower half of screen)
Chart of output values which were exported to MS Excel
Note
For best results with the ‘Keyness’ function, you should use input lists in which the Frequency data are relative (or standardised) frequencies generated with the word list function rather than just raw frequencies. If, for instance, the frequencies in the input lists are figures for N / 1000 of words from a word list then the lists are directly comparable. If they are raw frequencies then comparisons are not very sensible, i.e. one set of frequencies may stem from examining very large texts and another set from much smaller texts. For example, one set of frequencies might report 166 finds for a certain word in a large text and the second set might find 158 finds for the same word in a text only one tenth of the size of the first text. Now the difference between 166 and 158 is small (= 8, or 4.82% of 166) but in fact the relative frequency of the word in question is much greater in the smaller text: if the second text is one tenth the size of the first text then the relative frequency of findings is 1,580 to 166, i.e. the word in the second text is nearly 10 Cambria more common than in the first text. By generating relative frequencies, say based on the number of tokens per thousand words (N / 1000), you can see how common words are across files and you can sensibly compare the finds for such words, irrespective of the size of these files from which they are derived.
Virtually any text will show recurring word patterns which may not be obvious at first sight. Here text processing software like the present program can be useful. With the current option Corpus Presenter Text Tool will comb through any text and break it down into segments consisting of between 1 and 8 words and then lists these segments with their frequencies. Such a breakdown is useful when analysing the style of an author or when examining typical collocations in a language. The following illustrates the principle with chunks of three words at a time.
There are many options at your disposal with the current command, for instance you can view clusters alphabetically or by frequency and you can display the context in which each occurrence was found. Results can be saved in a user-specified manner as a text or a database.
Setting parameters for lexical clustering
Statistics for lexical clustering
Lexical clusters in context
Exporting returns from the Quick Search level
At several points in Corpus Presenter information can be exported to a Microsoft Excel table which can then be processed independently of Corpus Presenter. This type of data export is possible on the Finding Strings and Quick Search levels as well as with word lists generated from corpus texts or any directly loaded texts.
In addition you can store the statistics for finds as a database which can then be used for chart generation in Excel. The way this works is as follows: assume that you search for a certain structure across a set of 100 texts and that a percentage of these show the structure, but to varying extents. The database which Corpus Presenter stores to disk contains the names of those texts in which the structure was found and the number of Cambria it was found in each text. Such a database can then be loaded into Microsoft Excel and via the command “Insert”, “Chart” (after selecting all the rows and columns of the database with Ctrl-A) you can generate a chart in which the occurrences of the structure you searched for are shown graphically.
Corpus Presenter can gather up to eight sets of returns for a group of texts and transfer these to a database (for later chart generation). The advantage of this is you can see whether the occurrences of more than one structure run parallel across a set of texts, either ascending or descending. You can also check whether two or more structures run in opposite directions, e.g. whether the increase of one structure correlates with the decrease of another.
Exporting data to MS Excel
Exporting data to a database
This option works with a single-line grid on the Finding Strings level and with the returns grid in the Word list module. It generates a database in which each column is reflected as a field and each row as a record in the output database. Such a database can be processed by the database editor included in the Corpus Presenter suite or indeed by virtually any commercially available database management system.
Exporting data to an HTML file
Data from a set of returns on the Finding Strings or Quick Search levels can be exported to an HTML file in which the finds are displayed on centred lines with the search string highlighted in colour on each line. A number of parameters can be specified by the user including the colour used for highlighting and the rows to be exported.
A dataset file is a small text file which contains all the information needed for displaying the files of a corpus correctly in tree form. For each node of a tree three pieces of information are specified. In addition there are 11 parameters which are set at the beginning of the file and which determine the location of the corpus files and the manner in which they are displayed.
A control file for the Corpus Presenter is a plain ASCII file and can be edited with the Corpus Presenter Text Editor. Be careful not to save this in RTF or HTM format as it would no longer function properly as a control file. Note that any line in a control file which begins with a semicolon is regarded as a comment and ignored.
It is not advisable to alter the text file references unless you know exactly what you are doing. Always save the current control file under a new, temporary name, if you alter anything. Then check that it functions properly before deciding to keep it as an original version. There follows a brief description of the 11 parameters at the beginning of a control file.
1) Directory where all and only the data files are located. This very is important for a corpus like the Helsinki Corpus where the text files have no extension and where there is no formal means of identifying which files in a given directory belong to a corpus and which do not. Where no extension is used, the default assumption is that all files in a specified data directory are corpus files. If there is no path before a file name then the data directory is used; a path for a file will override this directory. A section of a path can be used. In this case the section is assumed to refer to subdirectories below the primary corpus data directory. If you wish to use the current directory as the data directory, i.e. the directory in which the present file is located, then just enter a single dollar sign: $
2) Wallpaper file (full path necessary)
3) Name of manual file (full path necessary)
4) ‘Frequently Asked Questions’, FAQ file (full path necessary)
5) ‘Fact Sheet’, FACT file (full path necessary)
6) Font for text display (legal names: Arial, Courier, Courier New, Garamond, Letter Gothic, Line Printer, Modern Tahoma, Terminal, Cambria).
7) Size of font (legal values 6, 7, 8, 9, 10, 11, 12, 14, 18, 20, 24). The font name and size given here only apply when the text files are standard ASCII files. If they are in either RTF (Rich Text Format) or HTM/HTML (Hypertext Markup Language) format then font information is contained in each file header and this takes precedence over any specification here.
8) Zoom factor (legal values 50, 75, 90, 95, 100, 105, 110, 115, 125, 150, 200). This only applies if quick text display is not selected.
9) Standard extension of files in this corpus. A corpus may use a typical extension for its files, as with A Corpus of Irish English – by the present author – the (text) files of which all end in .CIE. Do not enter a dot before the extension. Three asterisks, ***, indicate that the files have no extension (as with the Helsinki Corpus). Note that the following extensions are predefined within Corpus Presenter:
1) TXT,ASC,LST = Text files
10) Levels of tree visible at startup.
11) What icons for nodes? Book = 0, Folder = 1
First 11 parameters of control file for the Helsinki Corpus
G:\HELSINKI\TEXTS
Sample section of control file for the Helsinki Corpus (beginning, early Old English)
EXPLANATION There are three items of information for each node of a tree. The first is the description to be used as a label for a node (plain text). The second is the file associated with this node. If you enter DUMMY.RTF here then no file is displayed. This is necessary because there will be nodes in a tree which are empty, i.e. there are just links to other nodes further down the tree. Indeed it is normal, though not essential, that only the terminal nodes of a tree contain actual file references. The third item of information usually consists of three asterisks. The reason it is there at all is that with audio files you may wish to display an image file in the background. If you now specify a WAV file as item no. 2 and an image file as item no. 3 then the latter will be displayed while the former is played. By these means you could for example display a map of a region and play an audio file with the speech of that area at the same time.
You will notice that the description of many nodes is indented. This is deliberate and represents the means by which you specify what level in a tree the node is to be displayed on. The principle is as follow: every 4 spaces at the beginning of a node label represent an indent of one level below the first, i.e. no spaces indicate a node on the top-most level (level 1), 4 spaces indicate that the node is on level 2, 8 spaces on level 3, 12 on level 4, 16 on level 5 and 20 on level 6. A maximum of 6 levels is permissible.
Old English
Note. This section refers to the processing of legacy databases in the dBASE format. There may well be some colleagues at universities around the world who still use databases is this format and for that reason this section is kept here. However, I take it that the majority will wish to export the results of searches in MS Excel format for further processing (it is also possible to import dBASE databases into MS Excel) or as input to other software packages, e.g. one for the graphical representation of search statistics.
The database module, which is built into Corpus Presenter, offers you a comfortable interface to any database you might have on your hard disk. To load a database you simply choose a file with the extension .DBF from a directory listing. If you have not chosen a database, then you are prompted to select one from a listing.
Recall that a database is a structure which consists of a fixed number of columns (or fields) and a variable number of rows (or records). A database is often called a table and can be compared to a box of index cards.
Each record corresponds to a single card and the fields are used to store the information which you would typically enter onto an index card.
Data and display in the database module
A few points should be borne in mind about how the database grid behaves. You move around the grid using the arrow keys. To edit a field, click the left mouse button while you are inside the field. Initially the entire contents of a cell are selected so that typing leads to these being overwritten. You can use the normal Windows keys when editing, including Ctrl-C and Ctrl-X, Ctrl-V for Copy, Move and Paste respectively.
You will notice that if you press Delete when one or more records are selected then these are removed from the grid. Technically, they are marked for deletion in the underlying database but not physically removed from the database on disk.
Exporting records form a database
Most users will wish to extract information from databases and import this to another file for further processing. This is done via the current option. You specify whether all records or only those which are selected are to be exported and then whether to use a report form or not. In addition for the copy operation you say whether a separate line is to be used per field or whether all fields of a record are to be placed on a one line. But in fact the most flexible output option is to export data using a report form.
A report form is a filter which is used to organise the input data in a certain fashion for the ensuing output file.
There is a default report form which will output bibliographical data in a standard fashion. Use the supplied program Corpus Presenter Report Database with which you can generate report forms quickly and easily. The simplest way to do this is to copy the supplied report form default.dbr to a new file and then adapt this to suit your needs. When the data has been exported you are asked if you wish to view it with the default word processor, Corpus Presenter Word Processor.
Copying records from a database
Mark filtered records Usually a database contains many more records than one wishes to deal with at any given time. It is normal for users to want to extract only a selection of records from the entire database and to specify the condition for this selection. This is done with the present option which will select the records which match a filter condition specified by the user.
A filter condition can consist of up to three parts. For each part you specify a field and the contents it is to have to match the filter. Or the contents which it is not to have. With numeric fields (such as a field YEAR in a bibliographical database) you can state whether the filter is to accept values greater than, smaller than, equal to or not equal to your entry. Furthermore, you specify the connector which is to apply between the parts of the filter. There are three logical possibilities here: ‘and’, ‘or’, ‘and not’. The default connector is ‘and’.
A filter can consist of one, two or three parts. Fill in the parts from the top downwards. If the contents field is empty, then the filter is assumed not to contain that part, i.e. for a one part filter you enter something for the first contents field, for a two part filter you enter something for the first and second contents fields and for a three part filter you enter something for all contents fields.
Note that the selection of records is cumulative, i.e. any selection already present is retained. This fact can be useful if you wish to apply two filter conditions in succession to the same database. By these means you could achieve an even more accurate selection via filtering.
Shortcut: F5
Selected records To select records in the grid you click on the extreme left-hand side of a row, i.e. outside of the data area of the first field. To mark more than one record, hold the Control key depressed and click with the left button. The current row is selected maintaining the previously selected rows.
If you now choose the current option you are prompted to enter the name of a database to which you can export the selected records (rows). If the database exists then you must confirm overwriting it. If it does not exist, it is created. The selected rows are copied to this target and they are then shown in a window which displays the second, target database.
Shortcut: F8
View second database Assuming that you have already activated the second database by selecting records and exporting them to this target you can now view this database. The second database can be edited like the main database. Any changes made in the grid are committed to disk on closing the window.
Interfacing with text
If there is a text file with the same name as the database and the extension .RTF then this is loaded into a text box and displayed in a window below the database. The advantage of this is that you can maintain text files associated with specific databases and view the texts once the database has been loaded.
Shows the database help text. The supplied file DATABASE.TIP must be present in the home directory of the current program for this to work correctly.
When tagging texts you can avail of the options in the supplied text editor Corpus Presenter Text Tool. There are two modes for tagging with this program:
1) Interactive tagging (Ctrl-F3)
Both tagging options are to be found in the Tools menu of the program. If you like, you can use the shortcuts indicated in brackets above. Before starting tagging it is strongly advisable to consider what texts you wish to tag in what manner. The procedures available here are mechanical aids. They do not make any decisions on the contents of text. Successful tagging is only possible if the user designs a sensible tagging system and the words in the texts to be tagged are unambiguous. Think first of all what your goal in tagging is. It is a time-consuming procedure, but greatly accelerated by functions such as the present two. Nonetheless, tagging is as good as you make it. Whether it yields the results you want depends on how you go about it.
This is the easiest form of tagging and will work best when the forms to be tagged in a text are unambiguous. For instance, if you assign a tag _INTERROG_ADV to a form like which then the results are liable to be incorrect if your text(s) contains a sentence like The car which was stolen where which is a relative pronoun. So be careful with automatic tagging if there are polyfunctional forms in your text(s).
Before automatic tagging you must write (or adapt) a list file in which the tags and the forms (words or parts of words) which are to be assigned these tags are specified. Please consult the supplied file AUTO_TAG.LST to see how this is done. When the Automatic tagging window opens, you can select a list of tags (you can have several on disk if you wish). You must select the rows in table with tags and forms before tagging (or deselect ‘Only tag subset of forms’). You then select tags in the grid which appears in the usual way, by pressing either the Shift-key or the Ctrl-key along any of the arrow keys, just as in any Windows program. You may also say if tags are only to be attached to whole words and you can choose to confirm each tag. The latter is useful if you wish to skip forms to which a tag does not apply. You can also specify whether tags are to be highlighted (by red marking). This is only retained if you stored the tagged file(s) to disk as an RTF file(s).
Specifications for automatic tagging
Result of automatic tagging
Tagging a text consists of attaching a grammatical label as a suffix to a word form. This is an important aspect of preparing text corpora for later linguistic retrieval tasks, either by the compiler(s) or others who have access to these corpora. However, tagging texts is time-consuming and its accuracy depends on the nature of the texts and the tagging scheme used.
With the option Interactive tagging the user decides what category of label is to be suffixed to what word forms. Once this operation has been carried out grammatical information can be retrieved from the texts of a corpus by referencing the tags suffixed onto words which have been tagged. In general you cannot reference semantic information in a corpus, i.e. a tagged corpus is primarily intended for retrieving morphological and possibly syntactic information.
To tag words/forms in the current text, you first select (get from disk) a set of words/forms to fill the list Words to tag. You then get a list for Tags to use. Now select some words/forms (in the Words to tag list) which are to be assigned to one of the tags. The words/forms are entered in the sub-list on the left by clicking on the button Import checked forms. Choose a tag to be attached to each of these forms. This appears in the top-left corner. Start the tagging process by clicking on Start.
The maximum number of tags and of input forms is 512 items in each case. The lists can be created with Corpus Presenter Text Tool itself and stored to disk for later use on this level of the program. Take a look at the small file TEST_TAG.LST which is in the directory C:\Program Files (x86)\Corpus Presenter on your hard disk. This can be used for tags. Try the file TEST_INP.LST for a set of words/forms to be tagged. Use the file CHAUCER.ASC in the directory C:\Program Files (x86)\Corpus Presenter\Cp_Data\Test_Cp as a text with words/forms to be tagged. You can now experiment to see how the tagging actually works.
Tagging parameters 1) Words or strings Specifies is only words – or any string – can be tagged.
2) Case-sensitive search Determines whether small and capital letters are distinguished.
3) Automatic or manual Here you can decide whether Corpus Presenter Text Tool halts at each find and asks the user to confirm whether a form is to be tagged. Note that with manual tagging you can also edit the finds in the current text as you proceed.
Specifications for interactive tagging
Confirmation of interactive tagging
The storage area (cumulative clipboard)
Shortcut: Ctrl-G
A type of clipboard in which text is added without previous text being deleted (as with the Windows clipboard). Results from searches can deposited in this area cumulatively and then stored to disk or copied to another program. If you have material in the storage area you are reminded about this before exiting Corpus Presenter.
The internal text editor
Shortcut: Ctrl-E
In order to allow users to edit finds as text and perhaps other items of text such as input for searches or word list generation a flexible text editor is included in Corpus Presenter. Make sure that you save any text in this editor which might be important for you.
Calculation options
A number of calculations can be made with the internal calculator of Corpus Presenter. This is useful when editing finds perhaps or when working out some sums for text in the cumulative clipboard, storage area or internal text editor.
The directory lister level
Shortcut: Alt-L
This is a level of Corpus Presenter which offers an Explorer-like interface to the files on your computer. There are a wide variety of options on this level, including ones to generate a dataset file which can be used to display texts in a hierarchical form on the desktop. On the directory lister level you can also convert files across various formats as well as carry out certain housekeeping tasks such as copying, renaming or deleting files and/or folders.
The supplied file manager
Shortcut: Ctrl-M
There are a number of programs in the Corpus Presenter suite which perform functions incidental to the processing of corpus texts. Among these is the file manager with which you can carry out many useful tasks such as incremental backups of your own data.
Corpus Presenter utility Make Tree
This program allows you to design your own dataset files via an interactive and intuitive interface. With Corpus Presenterd Make Tree the task of producing your own dataset file(s) – and hence your own corpus tree(s) with a specified internal structure – is made as simple as possible.
In every window of Corpus Presenter the following keyboard shortcuts are active. They involve pressing the <Ctrl&rt; and <Alt&rt; keys together and then pressing one particular letter. You can open the window of all these keyboard shortcuts with <Ctrl-Alt-K>.
Reading and writing files
Corpus Presenter needs to read and - importantly - to write several small files to disk during its operation. For this reason it is very important that you have the right to do this. If you are working on a network computer make sure that you are allowed to write files on the network drive you are using. Should you be unsure about this, consult the technical staff responsible for maintaining the network. Note also that you cannot run Corpus Presenter from a CD-ROM drive as it is not possible to write files to this medium. Corpus Presenter will warn if some module attempts to use a file which is located on your CD-ROM drive.
Viewing a corpus
This is obviously the main purpose of Corpus Presenter. In order to do this it must have access to a small control file - called a dataset file - which has the extension .CPD. When you choose the first option - Open a dataset - in the File menu, Corpus Presenter offers you a list of the dataset files which are available on your computer. Assuming that you have installed Corpus Presenter properly onto your computer, then you should have at least one such file at your disposal, TEST.CPD, which has been supplied by the author to allow users to grasp the potential of the program. If you are using Corpus Presenter together with an existing corpus, such as A Corpus of Irish English (also on the CD-ROM accompanying the book and downloadable from the Corpus Presenter website), then there will be another dataset file, in this case CIE.CPD on your hard disk in the directory into which the A Corpus of Irish English was installed. Remember that without a control file no dataset can be loaded, but you can of course load files directly. In this case there is no hierarchical tree for display on the main level, but all the text retrieval functions are still at your disposal. If you have forgotten where the supplied control file(s) are located on your disk, then start the supplied utility Corpus Presenter Find Files and search for files ending in .CPD.
Do not alter the contents of a dataset file unless you are sure of what you are doing. If you wish to edit a dataset file, then use the supplied utility Corpus Presenter Make Tree to do this.
Sorting lists
Various options in Corpus Presenter, such as the word list or keyness functions as well as the search statistics window, offer you a list in the form of several rows with a number of columns. Among the latter may be numerical columns, e.g. for percentage or for the number of finds per 1,000 words, for instance. These columns can be sorted numerically by clicking on the column title. The first click will sort the column in ascending numerical order while the next click will do the same but in descending order. The third click will revert to ascending order and so on.
Screen display
For proper display Corpus Presenter requires a video setting of at least 1600 x 1200 pixels (dots on the screen), but preferably more. This resolution is suitable for monitors at least 24" in size. This setting is necessary to have the texts of various windows, messages, input boxes and the like shown correctly on the screen. You may also want to adjust the setting for screen fonts - accessible under Properties, Settings, Advanced on the Windows Desktop (click right mouse button) - if there is overflow of text in messages.
If the text area of a window is black, do not worry, this simply means that the user-specifiable colour has not been set. In a window where this might occur there will always be an option Set colour which you can activate to choose a colour for display.
Options are disabled
It is quite normal for Windows programs to disable certain options in the menus at the top of the screen when the level the user is on does not support them. This is the case in Corpus Presenter as well. You will notice that certain textual options are not always executable. This is because the tree is active or the screen is split (or both). The greatest number of textual options are available when the entire screen is used for text display.
Initialisation files
All the programs of the Corpus Presenter suite use a small text file - called an initialisation file - which is stored in the same directory as the program itself. Such a file contains personalised settings for various parameters of a program, e.g. the path for data files, colours used for display, options for program operations, for instance, when carrying out searches, etc. An initialisation file shows the same name as the program which generates it, but has the extension .INI, e.g. the program Corpus Presenter has the file name CPRESENT.EXE and its initialisation file is called CPRESENT.INI. These files should never be edited directly, nor should they ever be deleted. If this happens inadvertently, and you cannot recover the initialisation file in question from the Windows Recycled bin, then you will have to set the parameters for all programs again manually. It is advisable to make backups of program initialisation files, e.g. to a dedicated folder with a name like IniFileBackups. You can then copy any initialisation back from this directory to the main directory Corpus Presenter should an initialisation become corrupted. Note that there is also a ZIP file called IniFileBackups.zip which is in the main directory. You can extract any initialisation file you might need directory from this file by opening it with the Windows Explorer.
1) Corpus Presenter 2026 (Build 3.0, June 2026) represents a major overhaul and update of the program suite and supersedes all previous versions. If you have been working with a previous version, you are strongly recommended to only use the present version (the corpus dataset files are downwards compatible with earlier versions).
2) Corpus Presenter has been written entirely by Raymond Hickey. It is freeware, distributed solely for academic purposes, and can be used at liberty by students and scholars alike. If you have attained results from processing data with Corpus Presenter then I would request that you acknowlege this in any publications based on this data. You are free to recommend the software to others who can download it from the website and install it on their own computer.
3) All programs of the Corpus Presenter software suite have been thoroughly tested over the years and function correctly. Please note that I do not bear responsibility any for loss or disruption of data which may incur due to the manner in which you process your files with the software.
Raymond Hickey
3 Search
Input form
Word(s) returned from text RIDERS.CIE
b?g
big
gr??e
grace, grave
g??e
Give, gone
he*d
head, heard, he’d
ho*
holding, holds, hole, Holy, hook, hooker’s, horses, hour, house, house-six, How
1) WORD
5) REVERSE
2) FREQUENCY
6) PERCENT
3) FILE_NAME
7) LABEL
4) LOCATION
4 Database
5 Internet
6 Display
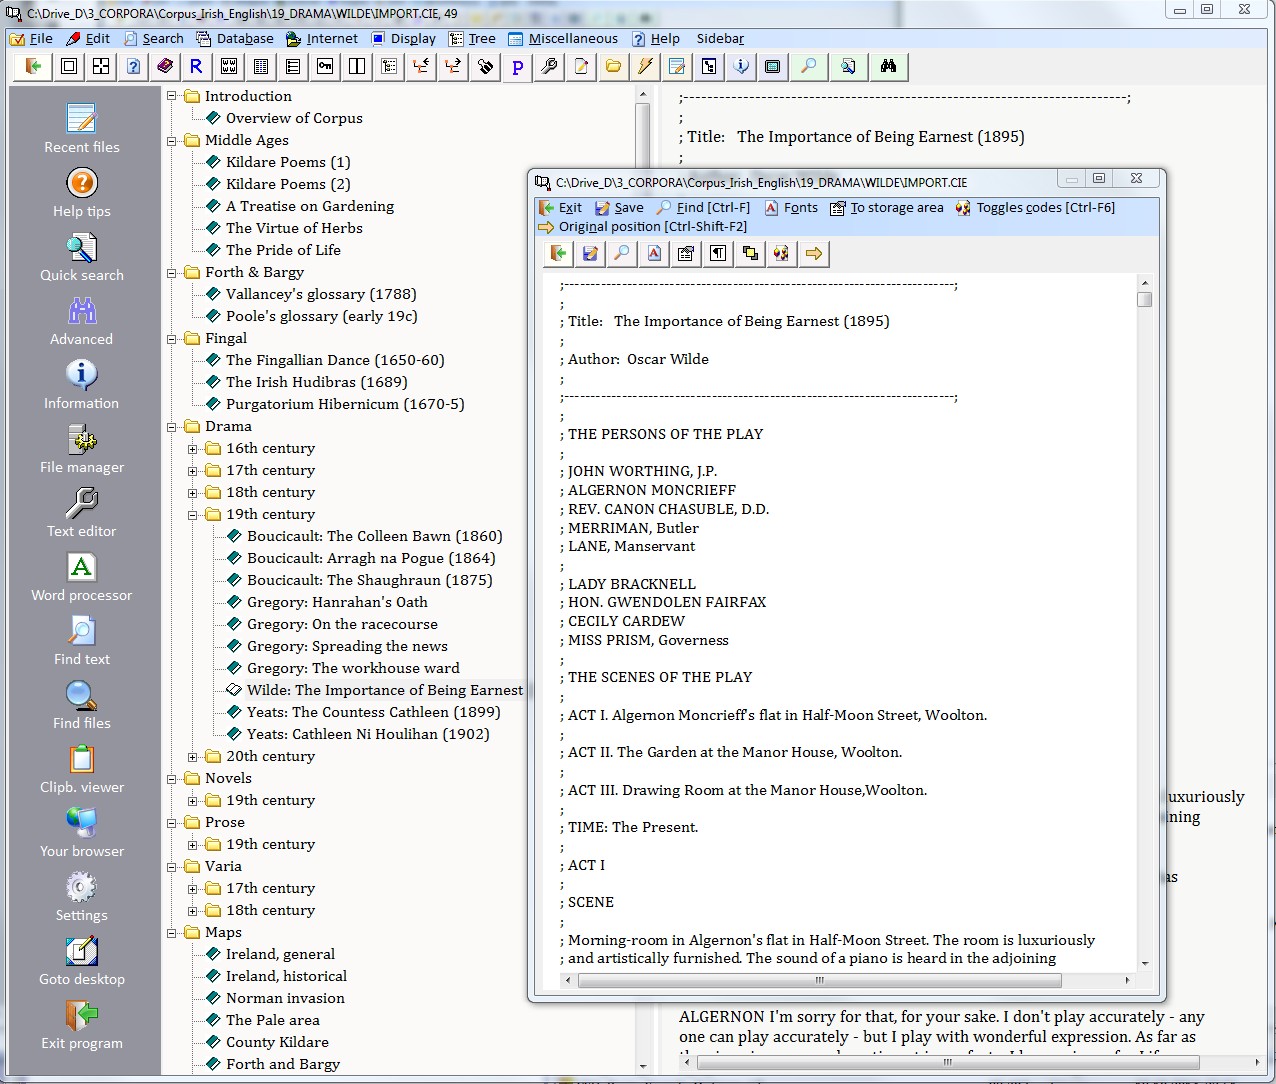
7 Tree
8 Miscellaneous
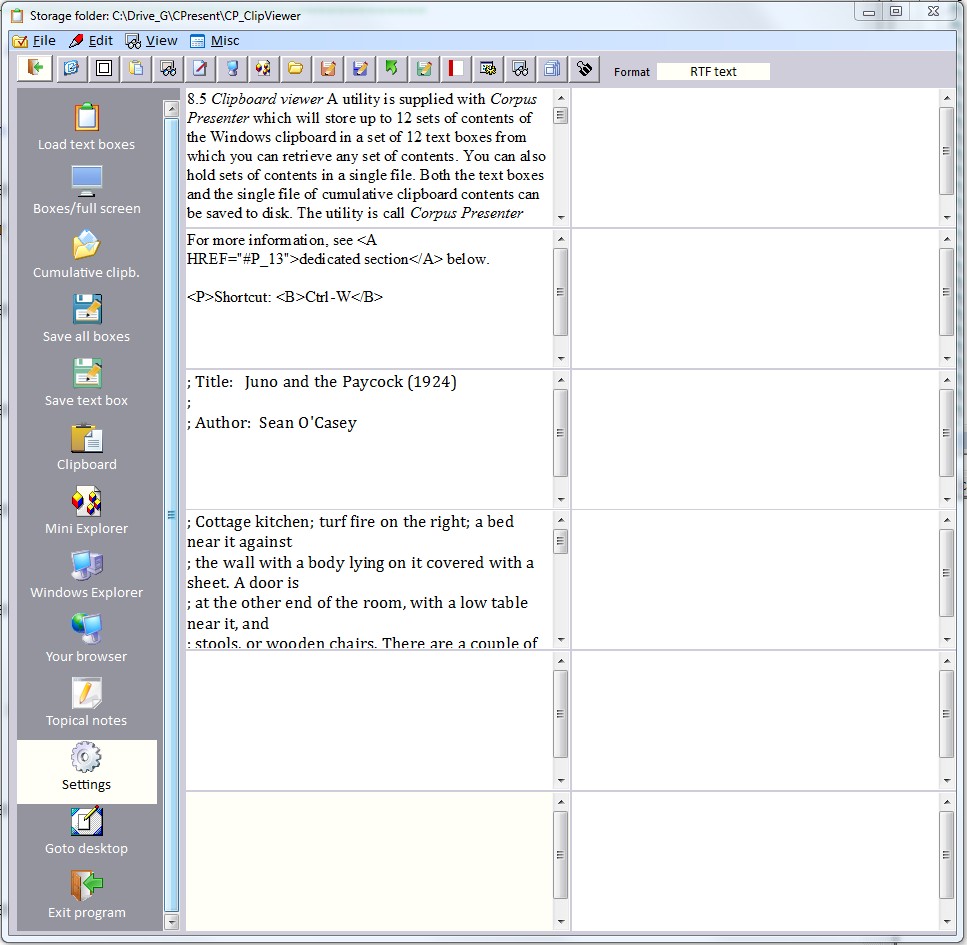
9 Help
Finding strings
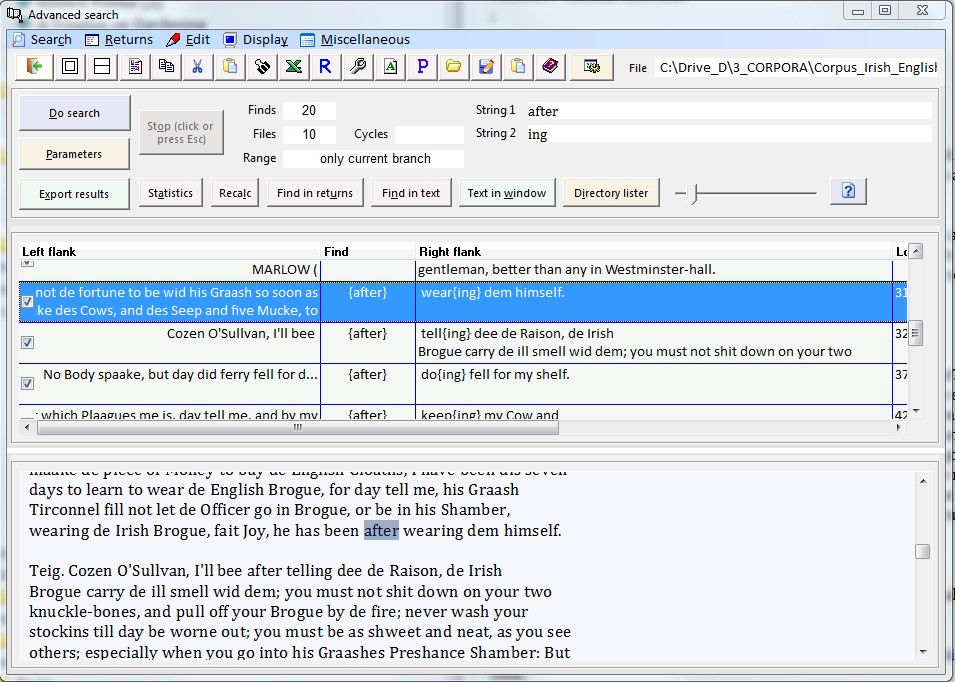
This option takes the left and right contexts and splits up the words of the flanks (as many as eight on each side) into columns of a grid. These columns can then be sorted by clicking on a column title. By these means you can recognise if certain strings occur in preferred contexts, i.e. if they form collocations. This option is also available on the Quick Search level.
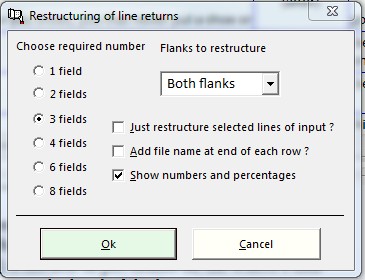
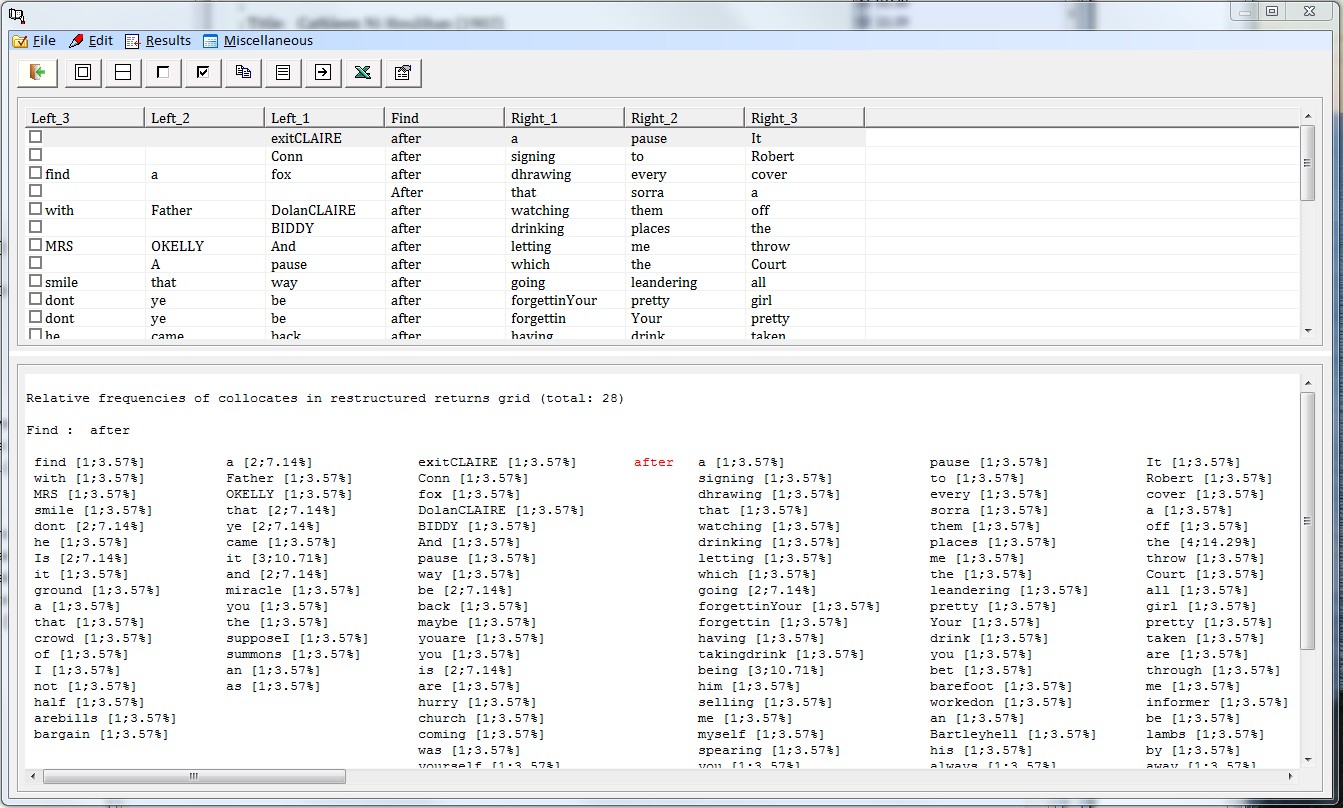
Parameter settings
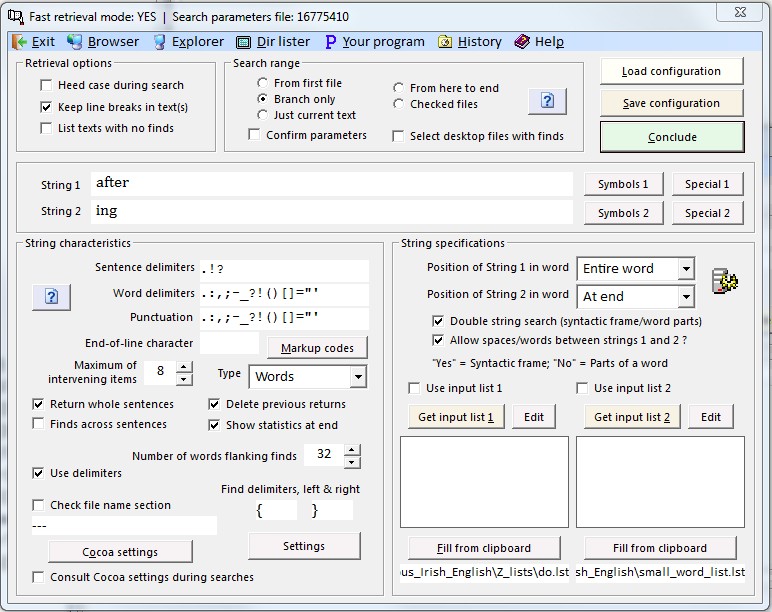
Right-hand string have
File range for search
Markup codes
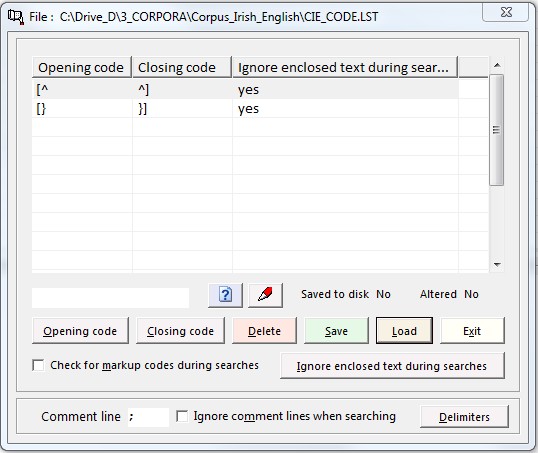
Search results
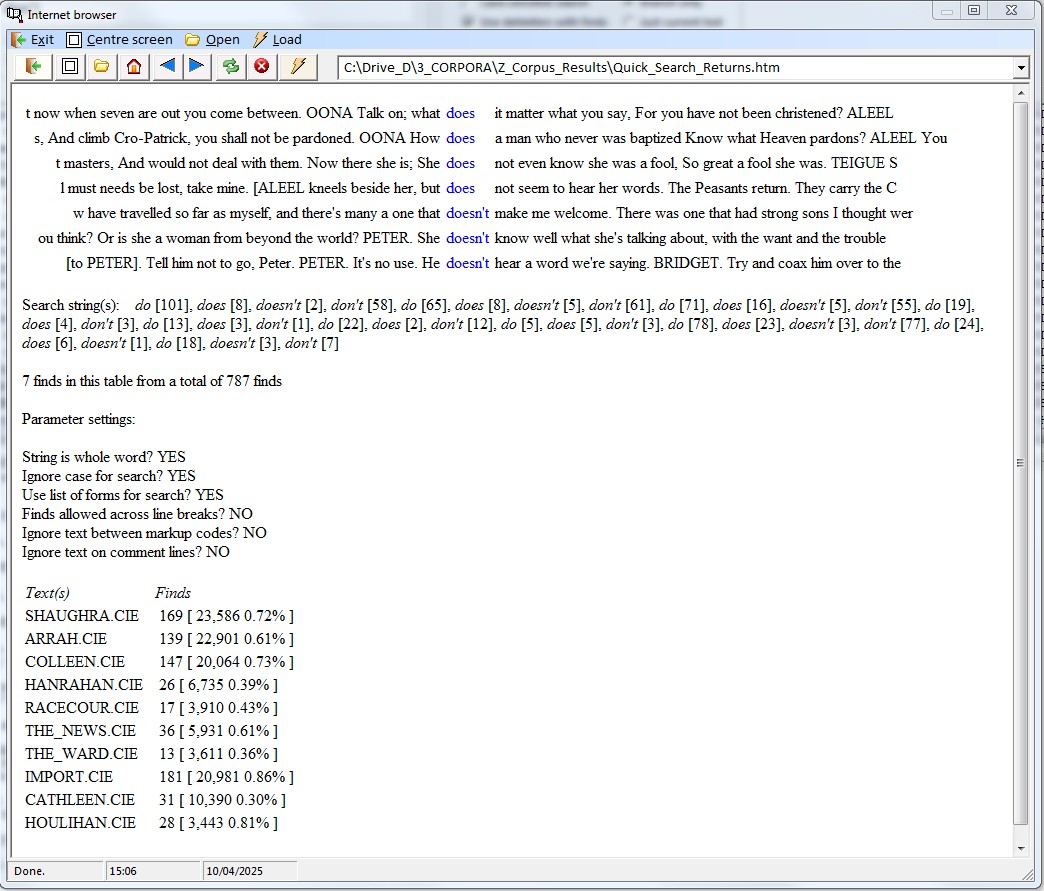
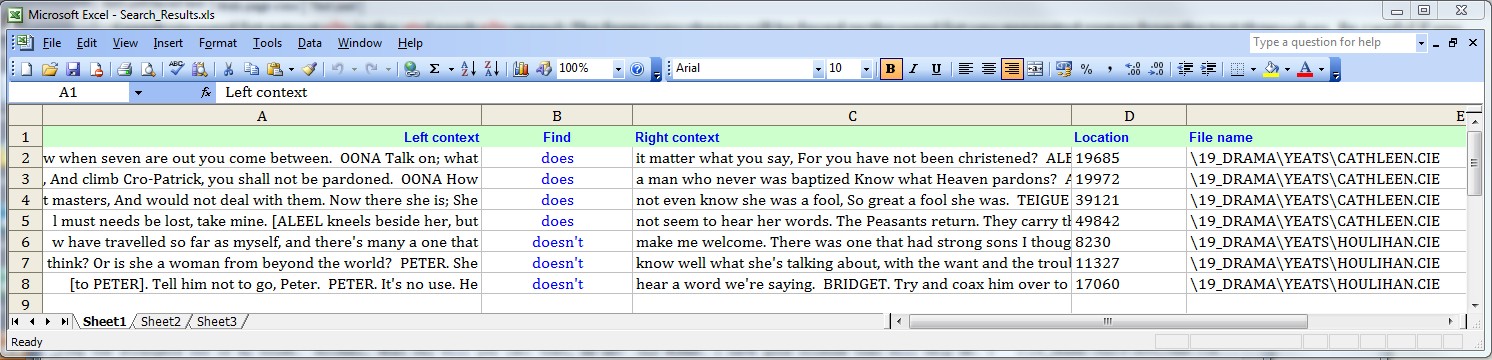
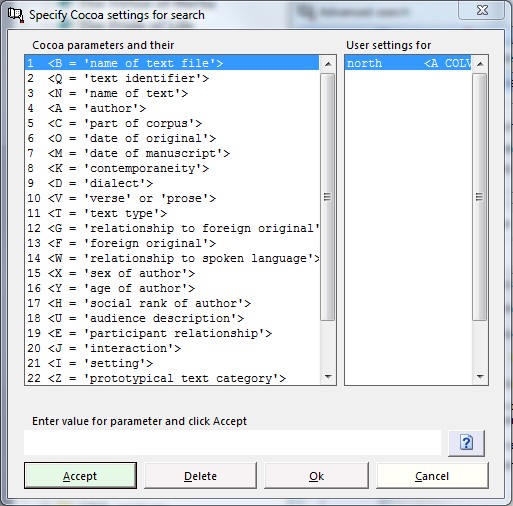
2 <Q = ‘text identifier’>
3 <N = ‘name of text’>
4 <A = ‘author’>
5 <C = ‘part of corpus’>
6 <O = ‘date of original’>
7 <M = ‘date of manuscript’>
8 <K = ‘contemporaneity’>
9 <D = ‘dialect’>
10 <V = ‘verse’ or ‘prose’>
11 <T = ‘text type’>
12 <G = ‘relationship to foreign original’>
13 <F = ‘foreign original’>
14 <W = ‘relationship to spoken language’>
15 <X = ‘sex of author’>
16 <Y = ‘age of author’>
17 <H = ‘social rank of author’>
18 <U = ‘audience description’>
19 <E = ‘participant relationship’>
20 <J = ‘interaction’>
21 <I = ‘setting’>
22 <Z = ‘prototypical text category’>
23 <S = ‘sample’>
24 <P = ‘page’>
25 <L = ‘line’>
26 <R = ‘record’>
<Q E3 XX CORP RHADDSR>
<N LET TO WIFE>
<A HADDOCK SR RICHARD>
<C E3>
<O 1640-1710>
<M X>
<K X>
<D ENGLISH>
<V PROSE>
<T LET PRIV>
<G X>
<F X>
<W WRITTEN>
<X MALE>
<Y 40-60>
<H PROF HIGH>
<U X>
<E INT DOWN>
<J INTERACTIVE>
<I INFORMAL>
<Z X>
<S SAMPLE X>
Statistics for finds
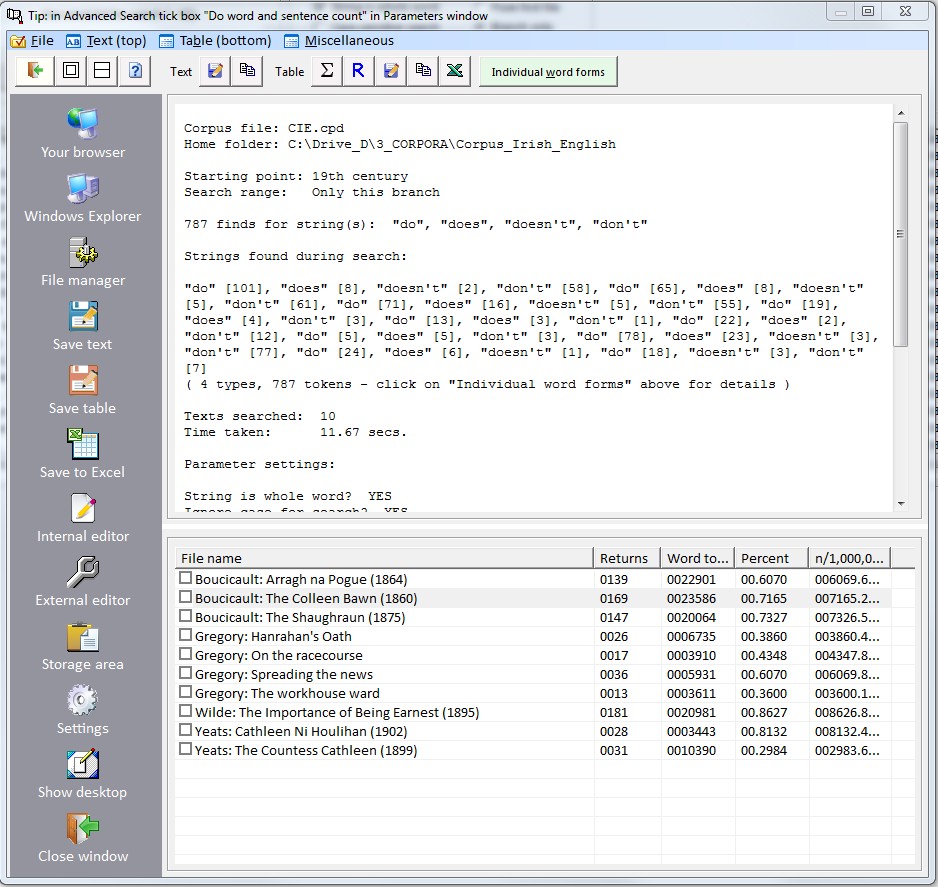
When there are no finds

Quick Search
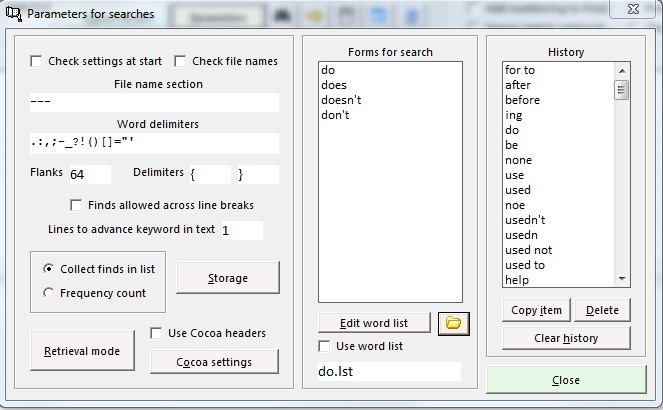
Using wildcards in searches
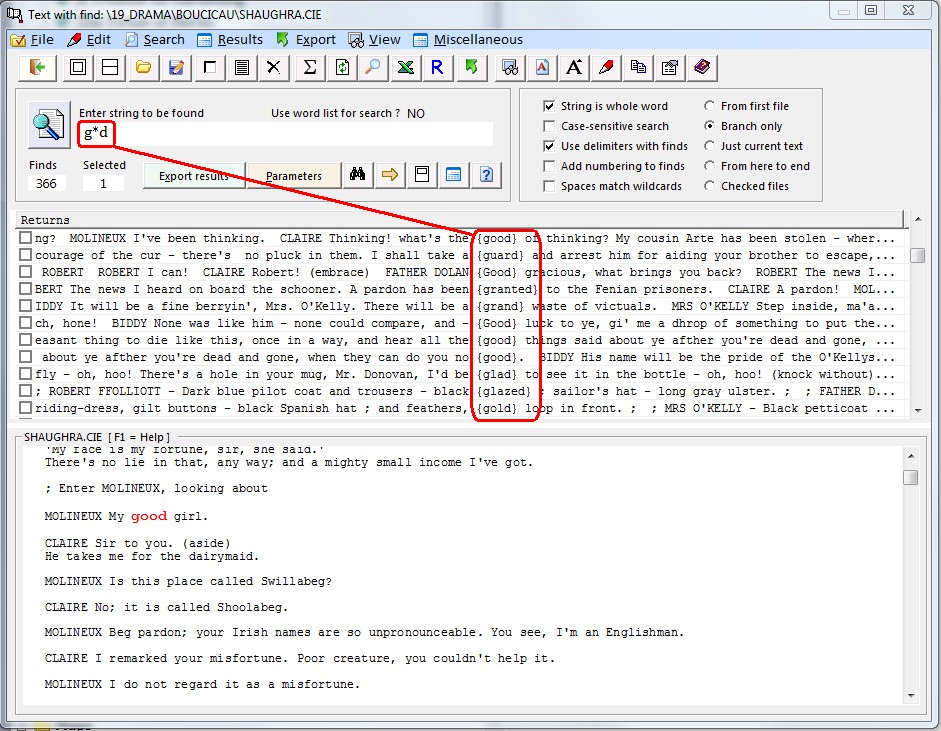
Search string
Returns
Switch
abc*
(i) Any string ‘abc’ and the rest to the end of the word it occurs in.
String is word = OFF
abc*
(ii) Any word starting in ‘abc’ and the rest to the end of the word.
String is word = ON
*abc
Any word ending in ‘abc’.
String is word = ON (automatic)
Search string
Returns
Switch
ab*c
(i) Any string starting in ‘ab’ and ending in ‘c’ with any number of intervening items.
String is word = OFF
ab*c
(i) Any word starting in ‘ab’ and ending in ‘c’ with any number of intervening items.
String is word = ON
Blitz Search
The third and quickest type of search function is Blitz Search. With it a small window opens and you can specify some basic information for a search. The system then combs through the selected files and gathers the finds which are subsequently displayed in the Storage Area window as plain text. You can save the finds to a normal text file, but not to an Excel spreadsheet or database. For the latter options, please use either the Finding Strings or Quick Search option.
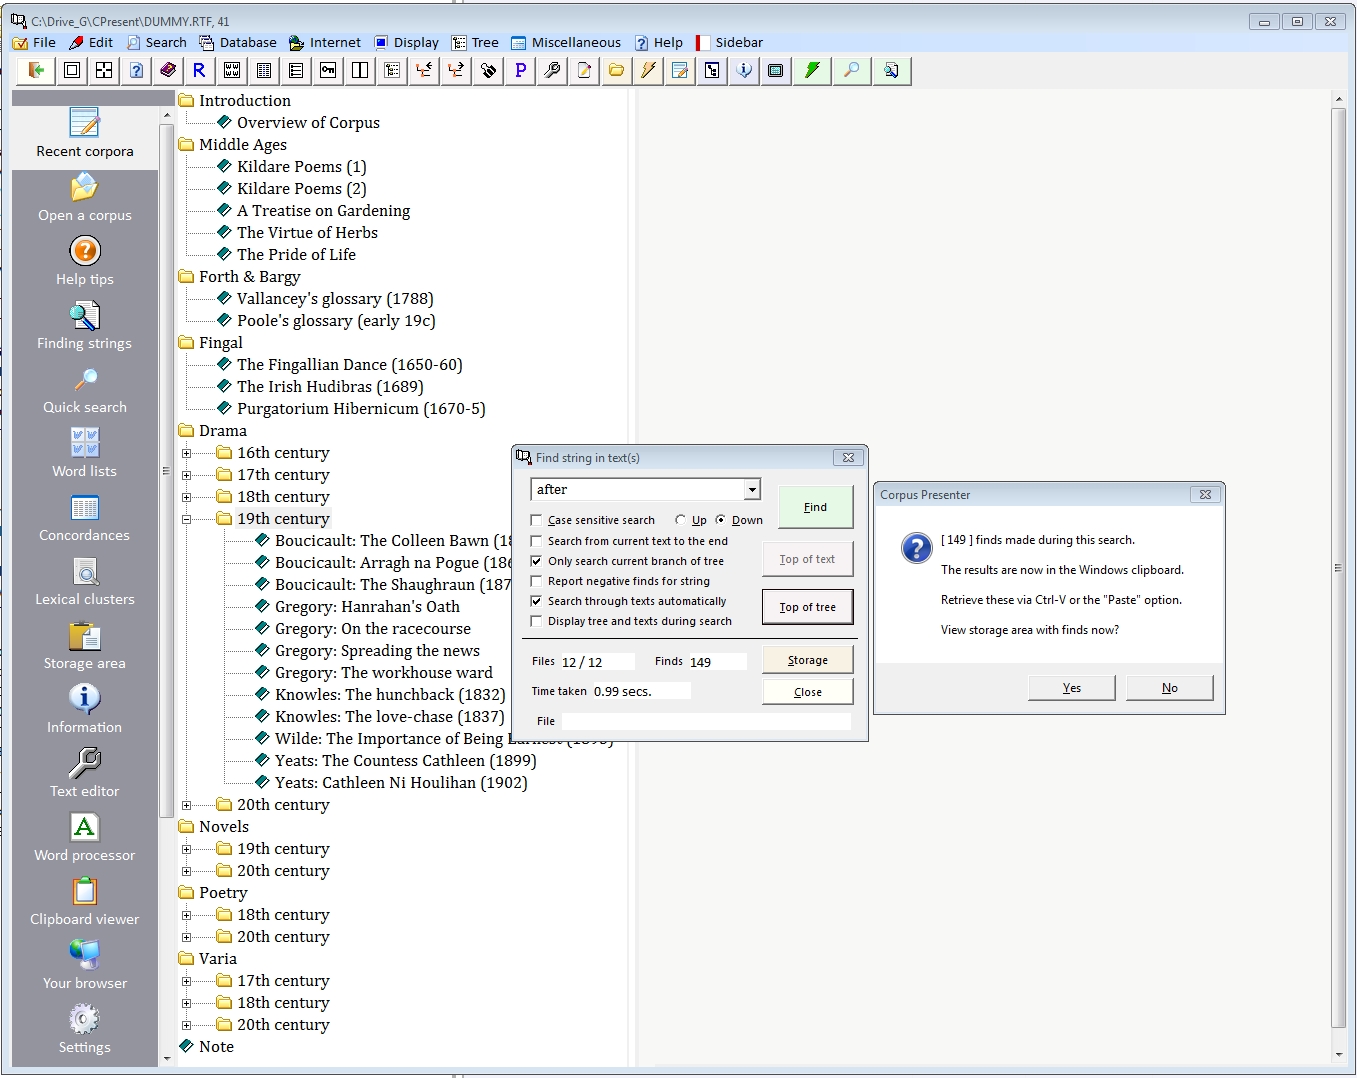
Building word lists
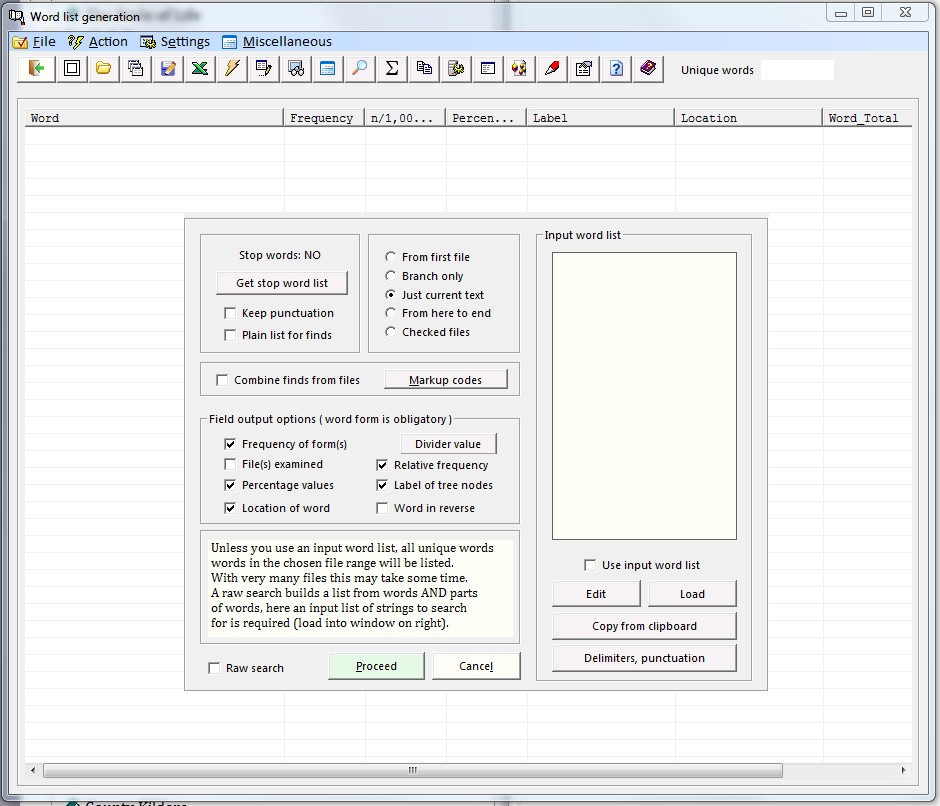
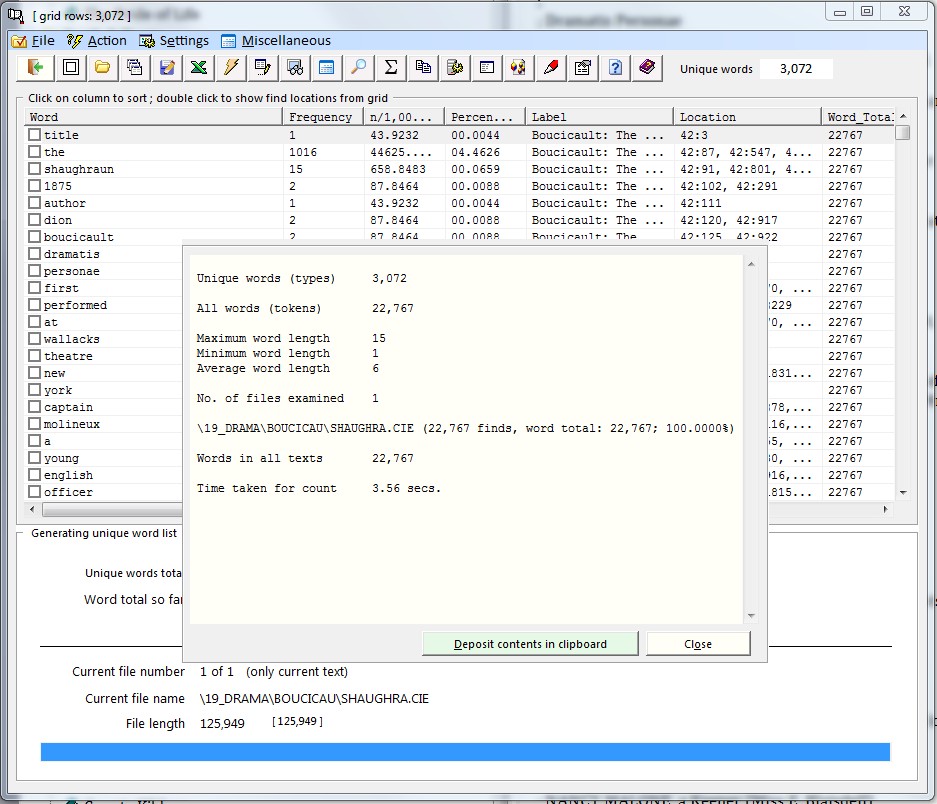
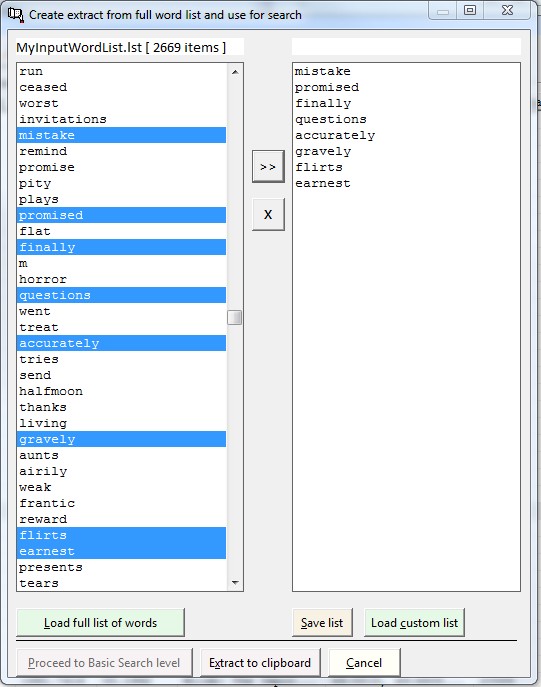
Using stop words
Word locations
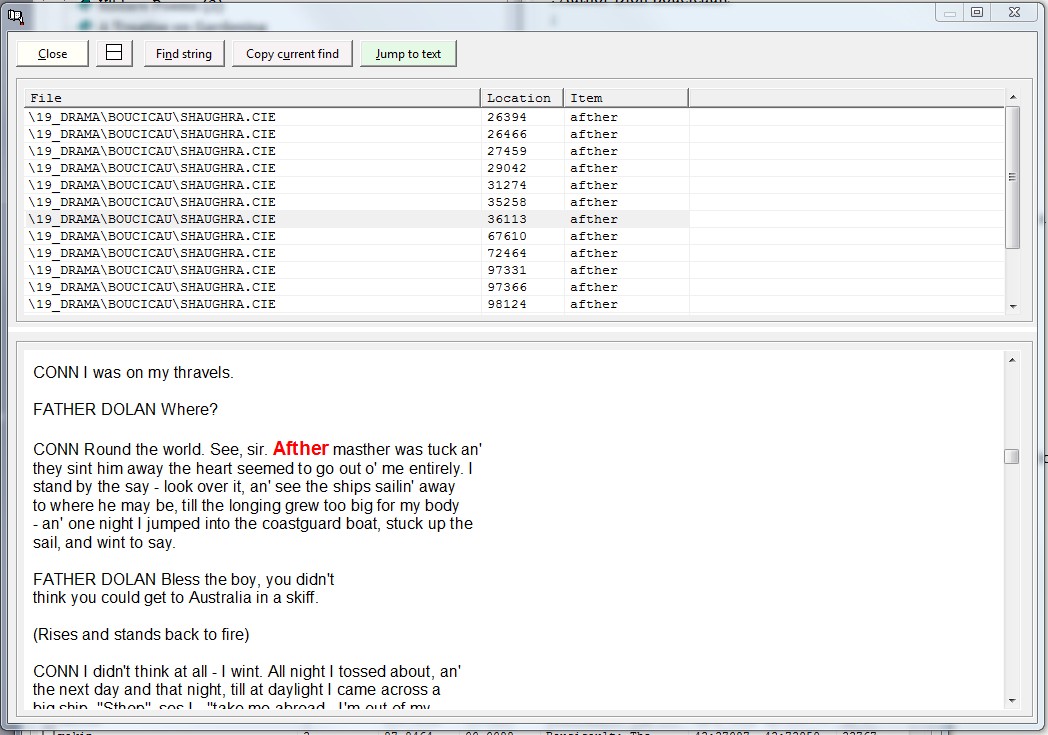
Making a concordance
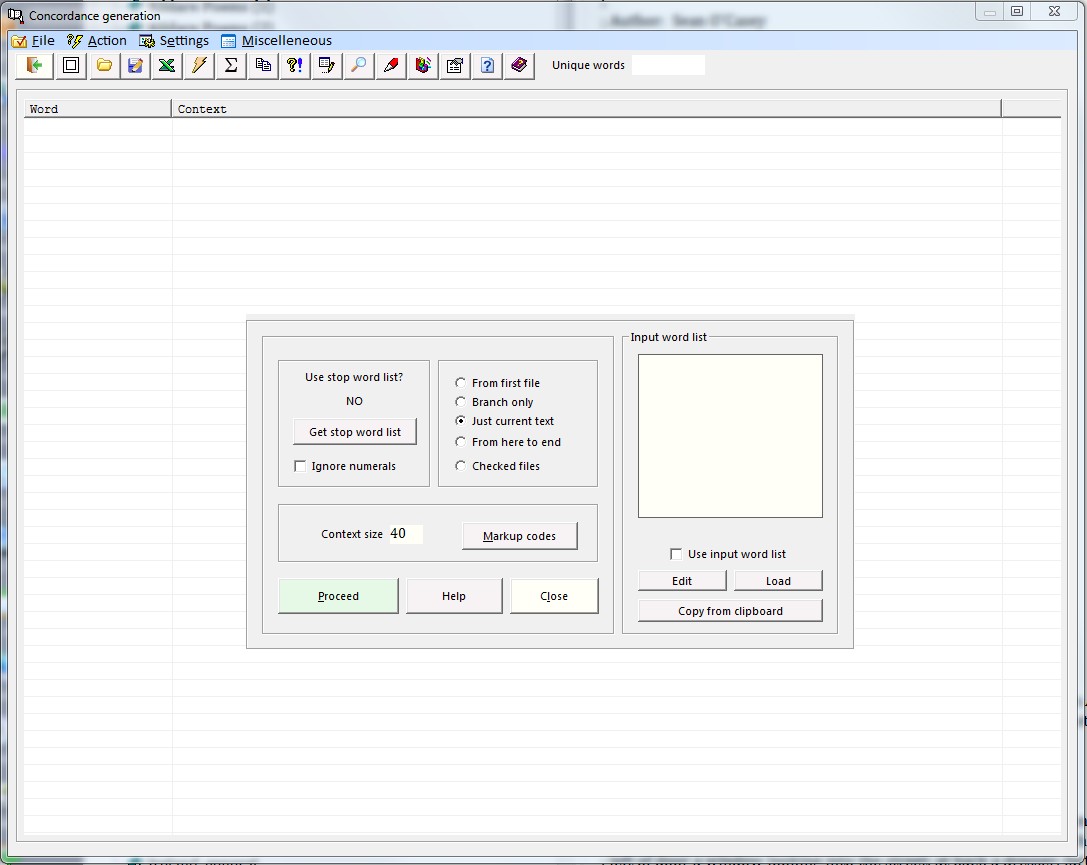
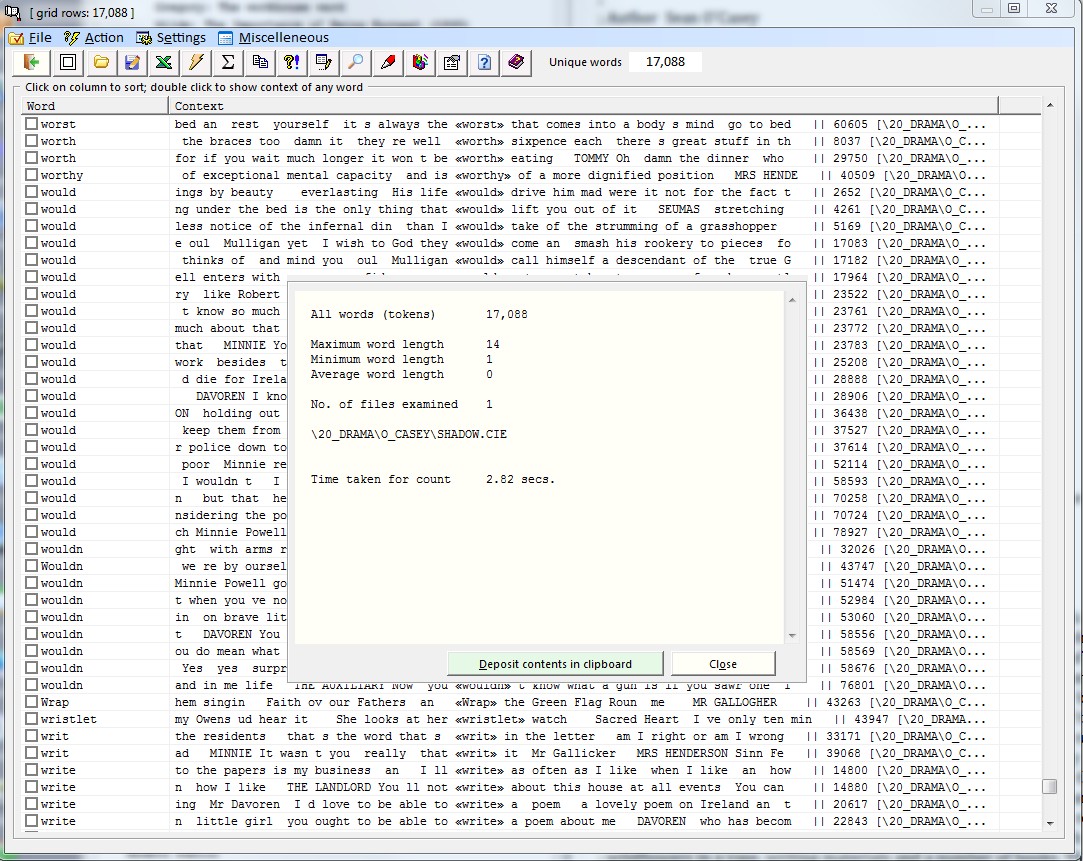
Examining texts for ‘keyness’
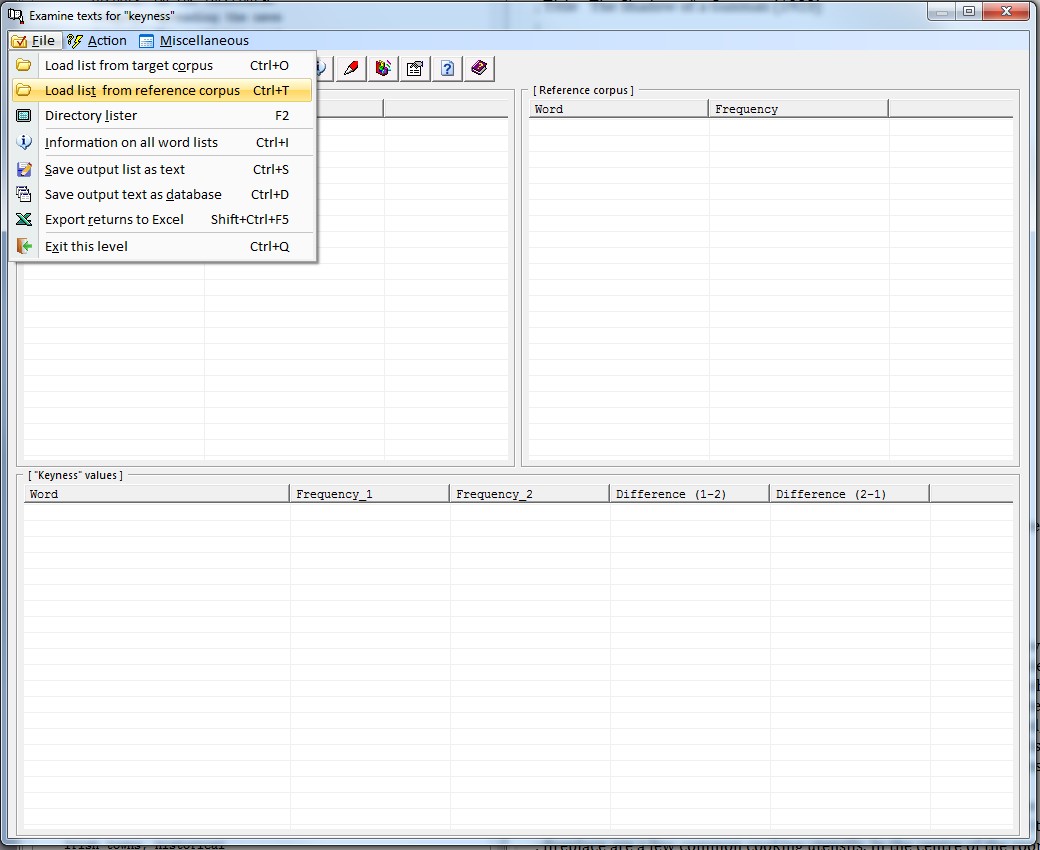

Lexical clustering
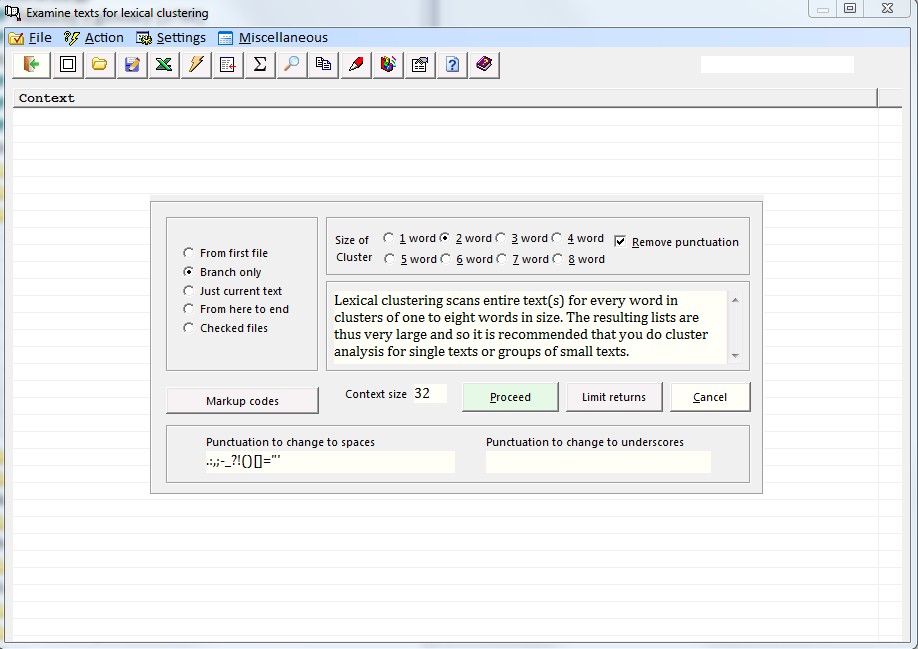
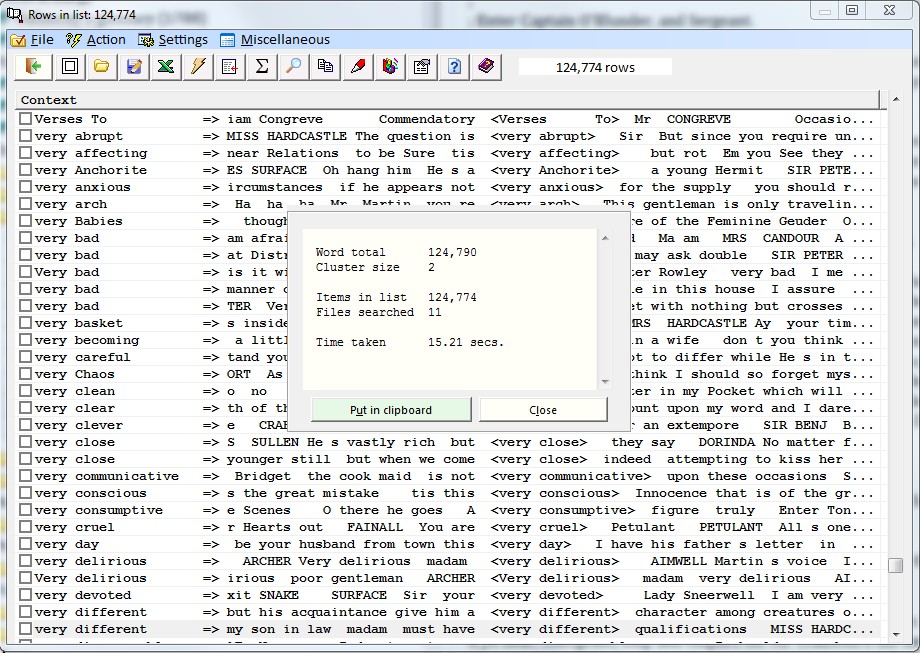

Exporting data from Corpus Presenter
Exporting returns from the Finding Strings level
.jpg)
.jpg)
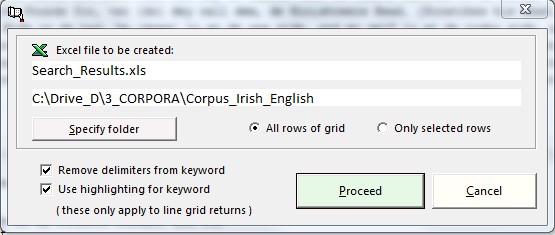
Exported data in MS Excel
Chart generation in MS Excel
Structure of a dataset file
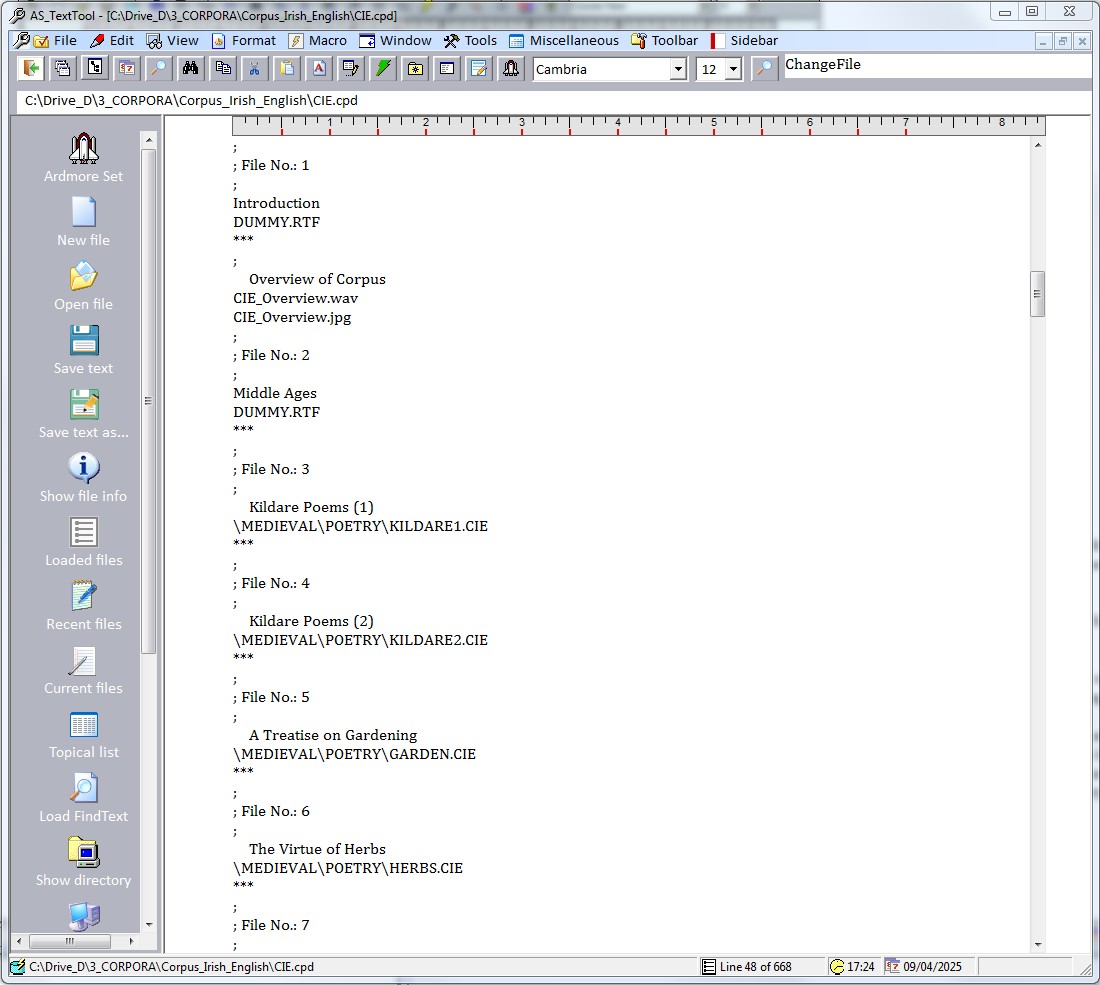
2) RTF = Rich Text Format files
3) HTM,HTML,XHTML = Internet files
4) DOC,DOCX = Microsoft Word files
G:\HELSINKI\MANUAL\HELSINKI.JPG
G:\HELSINKI\MANUAL\HEL_CORP.RTF
G:\HELSINKI\MANUAL\FAQS.RTF
G:\HELSINKI\MANUAL\FACT.RTF
Courier New
10
90
***
2
1
DUMMY.RTF
***
I ( - 850)
DUMMY.RTF
***
Documents
DUMMY.RTF
***
Documents 1 (Harmer, Robertson, Birch)
CODOCU1
***
Undefined text type (verse)
DUMMY.RTF
***
Caedmon’s Hymn; Bede’s Death Song; The Ruthwell Cross; The Leiden Riddle
CONORTHU
***
II (850-950)
DUMMY.RTF
***
Law
DUMMY.RTF
***
Alfred’s Introduction to Laws, Laws (Alfred), Laws (Ine)
COLAW2
***
Documents
DUMMY.RTF
***
Documents 2 (Harmer, Robertson, Sweet-Whitelock)
CODOCU2
***
Handbooks, medicine
DUMMY.RTF
***
Laeceboc
COLAECE
***
Philosophy
DUMMY.RTF
***
Alfred’s Boethius
COBOETH
***
Religious treatises
DUMMY.RTF
***
Alfred’s Cura Pastoralis
COCURA
***
Prefaces
DUMMY.RTF
***
Alfred’s Preface to Cura Pastoralis
COPREFCP
***
History
DUMMY.RTF
***
Chronicle MS A Early
COCHROA2
***
Bede’s Ecclesiastical History
COBEDE
***
Ohthere and Wulfstan (MS L)
COOHTWU2
***
Alfred’s Orosius
COOROSIU
***
The database module
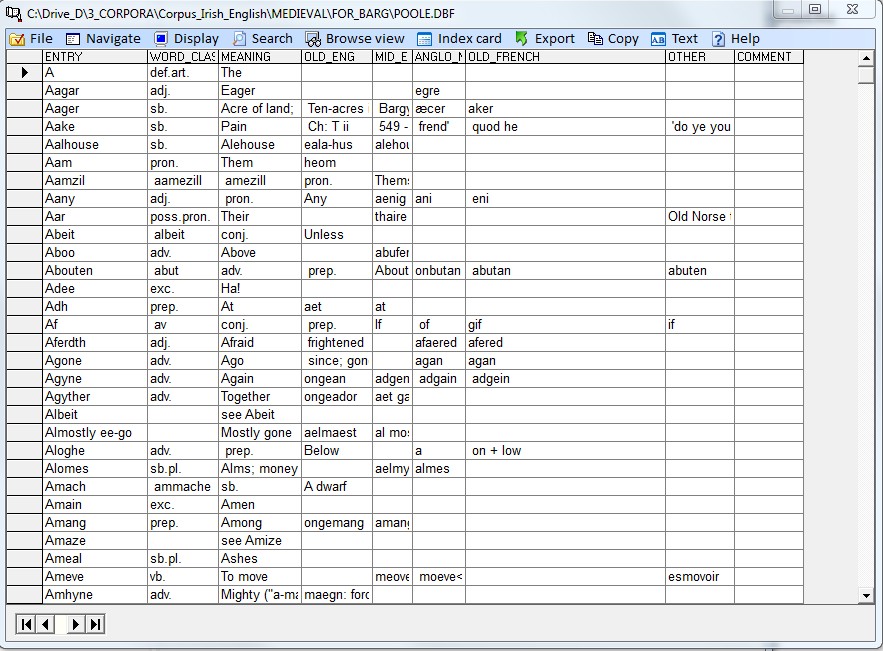
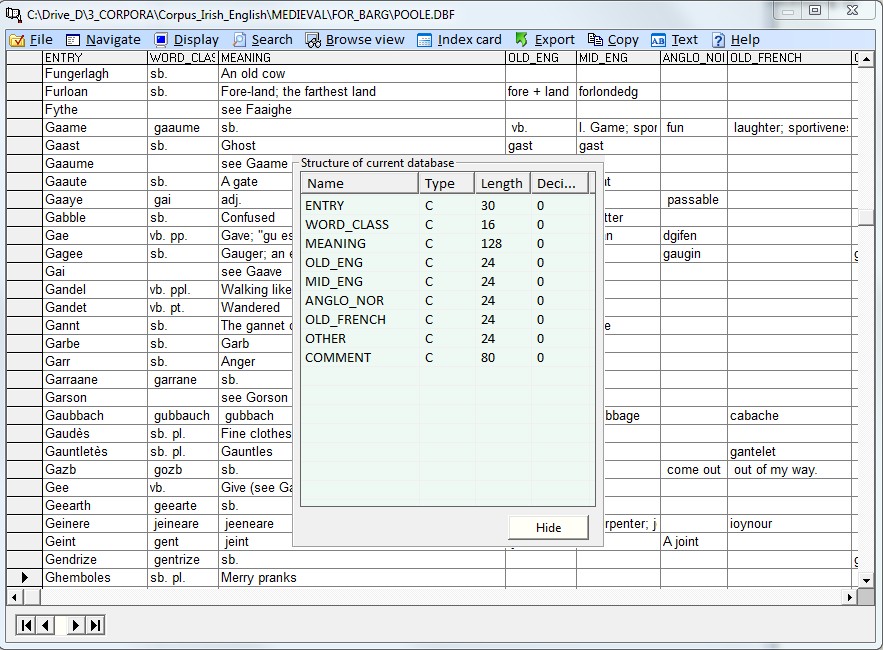
Source of data
Means of display
Database on disk
1) Grid mode (columns and rows, see above)
2) Index card mode (a record at a time, see below)
3) Browse view mode (first field list + card, see below)
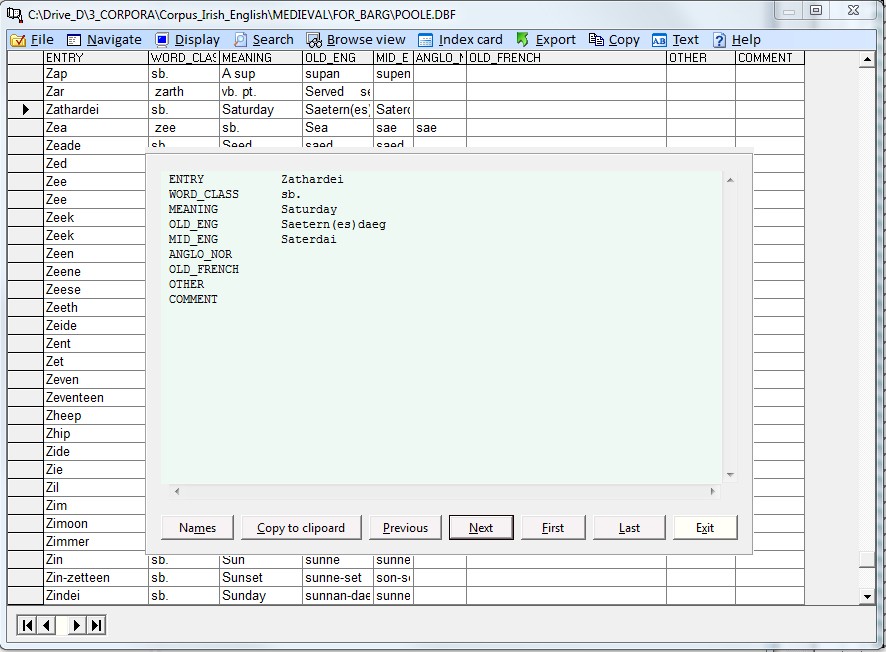
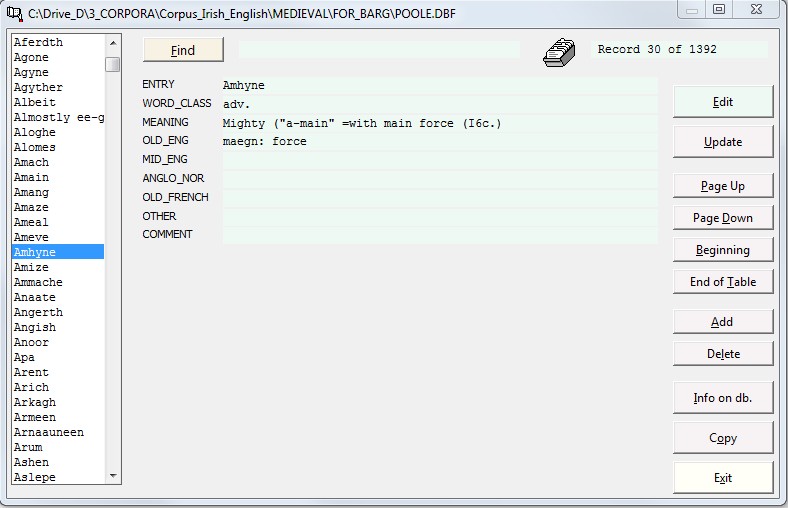
Input
Filter
Output
Database
Report form
Text file
Tagging texts
2) Automatic tagging (Shift-Ctrl-F3)
Automatic tagging
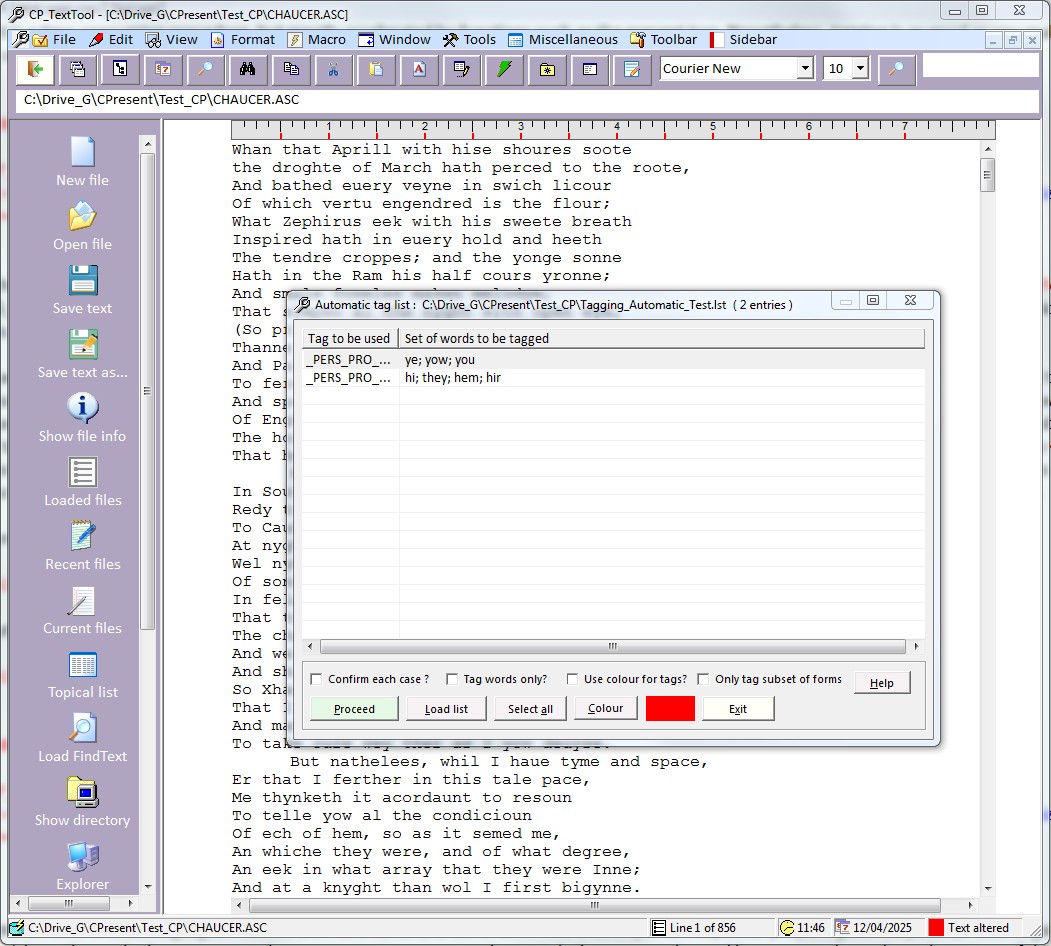
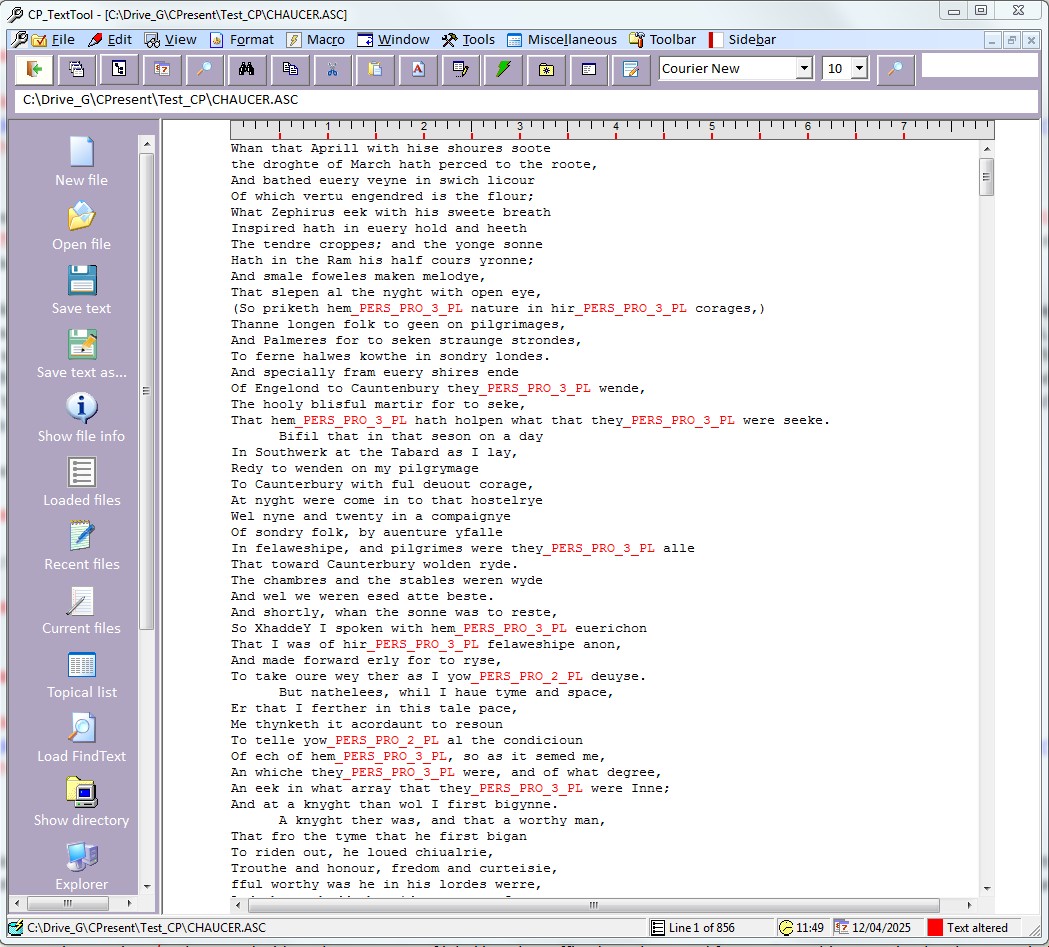
Interactive tagging
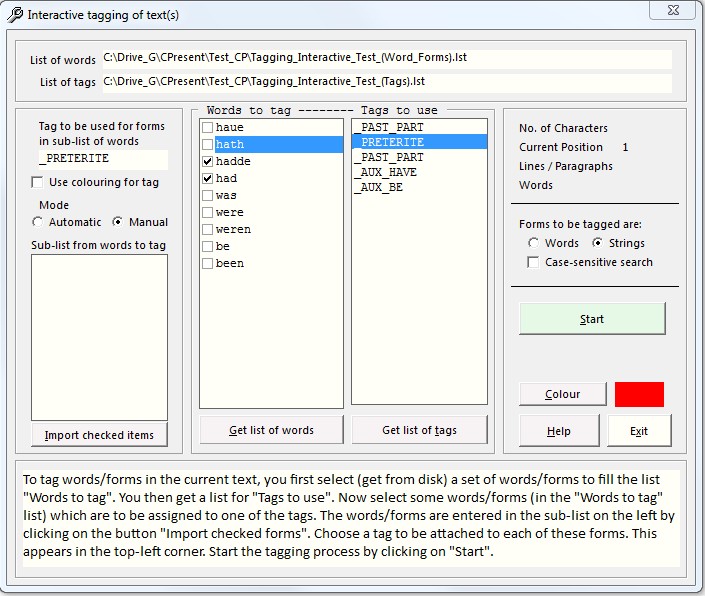
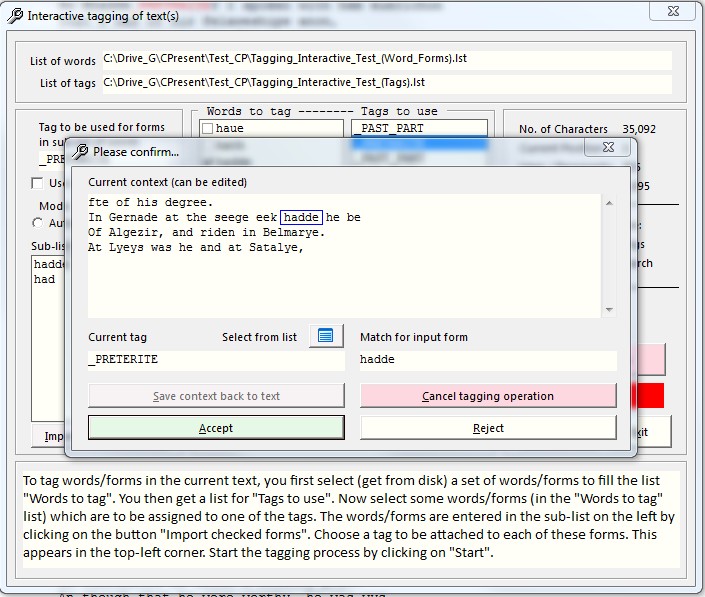
Additional features of Corpus Presenter
There are a number of features which apply on various levels of the program and which users should be aware of as they offer functions which can be useful in processing data derived from text files.
Keyboard shortcuts
Several keyboard shortcuts are available on various levels in Corpus Presenter. These are usually function keys and combinations of these and are indicated on the right-hand margin of a menu option which can be seen in one of the drop-down menus on a particular level. When you are entering a search string on the Finding Strings or Quick Search levels, pressing Shift-F6 will open a window with special characters; you can select any of these and enter them into the input line, for instance, characters required for European languages apart from English. There is also a special option beside the input line for the symbols required for Old and Middle English.
<Ctrl-Alt-B>
Load your internet browser
<Ctrl-Alt-C>
Load clipboard viewer
<Ctrl-Alt-D>
Go to the desktop of your computer
<Ctrl-Alt-E>
Load the internal text editor
<Ctrl-Alt-F>
Load the find files utility
<Ctrl-Alt-G>
Go to the storage area (the cumulative clipboard)
<Ctrl-Alt-J>
Load the external text editor
<Ctrl-Alt-L>
Open the directory lister
<Ctrl-Alt-M>
Load the supplied file manager
<Ctrl-Alt-P>
Load the supplied word processor
<Ctrl-Alt-T>
Load the find text utility
<Ctrl-Alt-X>
Load Windows Explorer
<Ctrl-Alt-W>
Open your list of websites
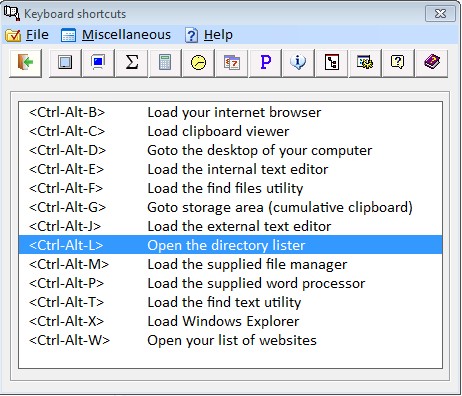
Troubleshooting
If a value for a numerical cell in a list has a decimal then this must be indicated by a period (dot) as decimal symbol. Note that certain continental European languages use a comma as decimal symbol. This will, however, lead to incorrect numerical sorting. To solve this difficulty you must convey to Windows that you wish to use a period as decimal symbol. To do this go to the Control Panel in Windows and then choose Regional and Language Options. Here you click on the button Customize and then in the tab Currency you specify a period as decimal symbol. Once this is done, Corpus Presenter will use a period as decimal symbol in numerical columns and sorting will be done correctly.
Notes
June 2026